Airplane Ground Schools
Knowledge of Flying is Our passion.
Serving the General Aviation Community
PURPOSE AND SCOPE
Ground reference maneuvers and their related factors are used in developing a high degree of pilot skill. Although most of these maneuvers are not performed as such in normal everyday flying, the elements and principles involved in each are applicable to performance of the customary pilot operations. They aid the pilot in analyzing the effect of wind and other forces acting on the airplane and in developing a fine control touch, coordination, and the division of attention necessary for accurate and safe maneuvering of the airplane.
All of the early part of the pilot’s training has been conducted at relatively high altitudes, and for the purpose of developing technique, knowledge of maneuvers, coordination, feel, and the handling of the airplane in general. This training will have required that most of the pilot’s attention be given to the actual handling of the airplane, and the results of control pressures on the action and attitude of the airplane.
If permitted to continue beyond the appropriate training stage, however, the student pilot’s concentration of attention will become a fixed habit, one that will seriously detract from the student’s ease and safety as a pilot, and will be very difficult to eliminate. Therefore, it is necessary, as soon as the pilot shows proficiency in the fundamental maneuvers, that the pilot be introduced to maneuvers requiring outside attention on a practical application of these maneuvers and the knowledge gained.
It should be stressed that, during ground reference maneuvers, it is equally important that basic flying technique previously learned be maintained. The flight instructor should not allow any relaxation of the student’s previous standard of technique simply because a new factor is added. This requirement should be maintained throughout the student’s progress from maneuver to maneuver. Each new maneuver should embody some advance and include the principles of the preceding one in order that continuity be maintained. Each new factor introduced should be merely a step-up of one already learned so that orderly, consistent progress can be made.
MANEUVERING BY REFERENCE TO GROUND OBJECTS
Ground track or ground reference maneuvers are performed at a relatively low altitude while applying wind drift correction as needed to follow a predetermined track or path over the ground. They are designed to develop the ability to control the airplane, and to recognize and correct for the effect of wind while dividing attention among other matters. This requires planning ahead of the airplane, maintaining orientation in relation to ground objects, flying appropriate headings to follow a desired ground track, and being cognizant of other air traffic in the immediate vicinity.
Ground reference maneuvers should be flown at an altitude of approximately 600 to 1,000 feet AGL. The actual altitude will depend on the speed and type of airplane to a large extent, and the following factors should be considered.
• The speed with relation to the ground should not be so apparent that events happen too rapidly.
• The radius of the turn and the path of the airplane over the ground should be easily noted and changes planned and effected as circumstances require.
• Drift should be easily discernable, but not tax the student too much in making corrections.
• Objects on the ground should appear in their proportion and size.
• The altitude should be low enough to render any gain or loss apparent to the student, but in no case lower than 500 feet above the highest obstruction.
During these maneuvers, both the instructor and the student should be alert for available forced-landing fields. The area chosen should be away from communities, livestock, or groups of people to prevent possible annoyance or hazards to others. Due to the altitudes at which these maneuvers are performed, there is little time available to search for a suitable field for landing in the event the need arises.
DRIFT AND GROUND TRACK CONTROL
Whenever any object is free from the ground, it is affected by the medium with which it is surrounded. This means that a free object will move in whatever direction and speed that the medium moves.
For example, if a powerboat is crossing a river and the river is still, the boat could head directly to a point on the opposite shore and travel on a straight course to that point without drifting. However, if the river were flowing swiftly, the water current would have to be considered. That is, as the boat progresses forward with its own power, it must also move upstream at the same rate the river is moving it downstream. This is accomplished by angling the boat upstream sufficiently to counteract the downstream flow. If this is done, the boat will follow the desired track across the river from the departure point directly to the intended destination point. Should the boat not be headed sufficiently upstream, it would drift with the current and run aground at some point downstream on the opposite bank.
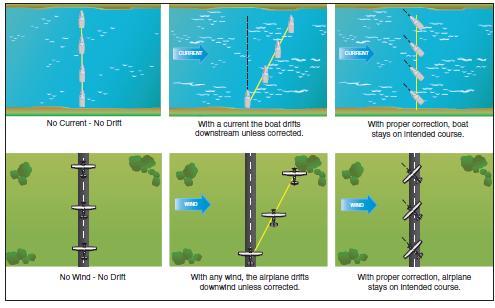
[Figure 6-1 Wind drift.]
As soon as an airplane becomes airborne, it is free of ground friction. Its path is then affected by the air mass in which it is flying; therefore, the airplane (like the boat) will not always track along the ground in the exact direction that it is headed. When flying with the longitudinal axis of the airplane aligned with a road, it may be noted that the airplane gets closer to or farther from the road without any turn having been made. This would indicate that the air mass is moving sideward in relation to the airplane. Since the airplane is flying within this moving body of air (wind), it moves or drifts with the air in the same direction and speed, just like the boat moved with the river current.
When flying straight and level and following a selected ground track, the preferred method of correcting for wind drift is to head the airplane (wind correction angle) sufficiently into the wind to cause the airplane to move forward into the wind at the same rate the wind is moving it sideways. Depending on the wind velocity, this may require a large wind correction angle or one of only a few degrees. When the drift has been neutralized, the airplane will follow the desired ground track.
To understand the need for drift correction during flight, consider a flight with a wind velocity of 30 knots from the left and 90° to the direction the airplane is headed. After 1 hour, the body of air in which the airplane is flying will have moved 30 nautical miles (NM) to the right. Since the airplane is moving with this body of air, it too will have drifted 30 NM to the right. In relation to the air, the airplane moved forward, but in relation to the ground, it moved forward as well as 30 NM to the right.
There are times when the pilot needs to correct for drift while in a turn.
[Figure 6-2. Effect of wind during a turn.]
Throughout the turn the wind will be acting on the airplane from constantly changing angles. The relative wind angle and speed govern the time it takes for the airplane to progress through any part of a turn. This is due to the constantly changing groundspeed. When the airplane is headed into the wind, the groundspeed is decreased; when headed downwind, the groundspeed is increased. Through the crosswind portion of a turn, the airplane must be turned sufficiently into the wind to counteract drift.
To follow a desired circular ground track, the wind correction angle must be varied in a timely manner because of the varying groundspeed as the turn progresses. The faster the groundspeed, the faster the wind correction angle must be established; the slower the groundspeed, the slower the wind correction angle may be established. It can be seen then that the steepest bank and fastest rate of turn should be made on the downwind portion of the turn and the shallowest bank and slowest rate of turn on the upwind portion.
The principles and techniques of varying the angle of bank to change the rate of turn and wind correction angle for controlling wind drift during a turn are the same for all ground track maneuvers involving changes in direction of flight.
When there is no wind, it should be simple to fly along a ground track with an arc of exactly 180° and a constant radius because the flightpath and ground track would be identical. This can be demonstrated by approaching a road at a 90° angle and, when directly over the road, rolling into a medium-banked turn, then maintaining the same angle of bank throughout the 180° of turn.
To complete the turn, the rollout should be started at a point where the wings will become level as the airplane again reaches the road at a 90° angle and will be directly over the road just as the turn is completed. This would be possible only if there were absolutely no wind and if the angle of bank and the rate of turn remained constant throughout the entire maneuver. If the turn were made with a constant angle of bank and a wind blowing directly across the road, it would result in a constant radius turn through the air. However, the wind effects would cause the ground track to be distorted from a constant radius turn or semicircular path. The greater the wind velocity, the greater would be the difference between the desired ground track and the flightpath. To counteract this drift, the flightpath can be controlled by the pilot in such a manner as to neutralize the effect of the wind, and cause the ground track to be a constant radius semicircle.
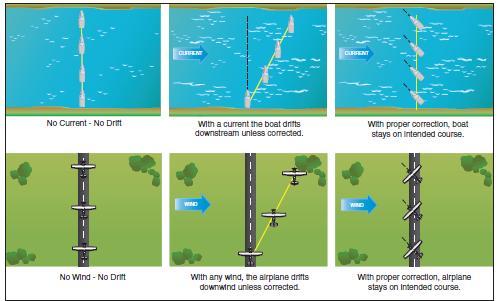
The effects of wind during turns can be demonstrated after selecting a road, railroad, or other ground reference that forms a straight line parallel to the wind. Fly into the wind directly over and along the line and then make a turn with a constant medium angle of bank for 360° of turn.
[Figure 6-3. Effect of wind during turns]
The airplane will return to a point directly over the line but slightly downwind from the starting point, the amount depending on the wind velocity and the time required to complete the turn. The path over the ground will be an elongated circle, although in reference to the air it is a perfect circle. Straight flight during the upwind segment after completion of the turn is necessary to bring the airplane back to the starting position.
A similar 360° turn may be started at a specific point over the reference line, with the airplane headed directly downwind. In this demonstration, the effect of wind during the constant banked turn will drift the airplane to a point where the line is reintercepted, but the 360° turn will be completed at a point downwind from the starting point. Another reference line which lies directly crosswind may be selected and the same procedure repeated, showing that if wind drift is not corrected the airplane will, at the completion of the 360° turn, be headed in the original direction but will have drifted away from the line a distance dependent on the amount of wind.
From these demonstrations, it can be seen where and why it is necessary to increase or decrease the angle of bank and the rate of turn to achieve a desired track over the ground. The principles and techniques involved can be practiced and evaluated by the performance of the ground track maneuvers discussed in this chapter.
RECTANGULAR COURSE
Normally, the first ground reference maneuver the pilot is introduced to is the rectangular course.
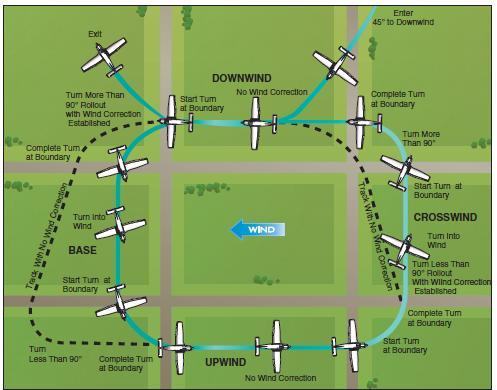
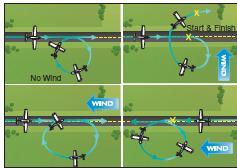
[Figure 6-4 Rectangular course]
The rectangular course is a training maneuver in which the ground track of the airplane is equidistant from all sides of a selected rectangular area on the ground. The maneuver simulates the conditions encountered in an airport traffic pattern. While performing the maneuver, the altitude and airspeed should be held constant. The maneuver assists the student pilot in perfecting:
• Practical application of the turn.
• The division of attention between the flightpath, ground objects, and the handling of the airplane.
• The timing of the start of a turn so that the turn will be fully established at a definite point over the ground.
• The timing of the recovery from a turn so that a definite ground track will be maintained.
• The establishing of a ground track and the determination of the appropriate “crab” angle.
Like those of other ground track maneuvers, one of the objectives is to develop division of attention between the flightpath and ground references, while controlling the airplane and watching for other aircraft in the vicinity. Another objective is to develop recognition of drift toward or away from a line parallel to the intended ground track. This will be helpful in recognizing drift toward or from an airport runway during the various legs of the airport traffic pattern.
For this maneuver, a square or rectangular field, or an area bounded on four sides by section lines or roads (the sides of which are approximately a mile in length), should be selected well away from other air traffic. The airplane should be flown parallel to and at a uniform distance about one-fourth to one-half mile away from the field boundaries, not above the boundaries. For best results, the flightpath should be positioned outside the field boundaries just far enough that they may be easily observed from either pilot seat by looking out the side of the airplane. If an attempt is made to fly directly above the edges of the field, the pilot will have no usable reference points to start and complete the turns. The closer the track of the airplane is to the field boundaries, the steeper the bank necessary at the turning points. Also, the pilot should be able to see the edges of the selected field while seated in a normal position and looking out the side of the airplane during either a left-hand or right-hand course. The distance of the ground track from the edges of the field should be the same regardless of whether the course is flown to the left or right. All turns should be started when the airplane is abeam the corner of the field boundaries, and the bank normally should not exceed 45°. These should be the determining factors in establishing the distance from the boundaries for performing the maneuver.
Although the rectangular course may be entered from any direction, this discussion assumes entry on a downwind.
On the downwind leg, the wind is a tailwind and results in an increased groundspeed. Consequently, the turn onto the next leg is entered with a fairly fast rate of roll-in with relatively steep bank. As the turn progresses, the bank angle is reduced gradually because the tailwind component is diminishing, resulting in a decreasing groundspeed.
During and after the turn onto this leg (the equivalent of the base leg in a traffic pattern), the wind will tend to drift the airplane away from the field boundary. To compensate for the drift, the amount of turn will be more than 90°.
The rollout from this turn must be such that as the wings become level, the airplane is turned slightly toward the field and into the wind to correct for drift. The airplane should again be the same distance from the field boundary and at the same altitude, as on other legs. The base leg should be continued until the upwind leg boundary is being approached. Once more the pilot should anticipate drift and turning radius. Since drift correction was held on the base leg, it is necessary to turn less than 90° to align the airplane parallel to the upwind leg boundary. This turn should be started with a medium bank angle with a gradual reduction to a shallow bank as the turn progresses. The rollout should be timed to assure paralleling the boundary of the field as the wings become level.
While the airplane is on the upwind leg, the next field boundary should be observed as it is being approached, to plan the turn onto the crosswind leg. Since the wind is a headwind on this leg, it is reducing the airplane’s groundspeed and during the turn onto the crosswind leg will try to drift the airplane toward the field. For this reason, the roll-in to the turn must be slow and the bank relatively shallow to counteract this effect. As the turn progresses, the headwind component decreases, allowing the groundspeed to increase. Consequently, the bank angle and rate of turn are increased gradually to assure that upon completion of the turn the crosswind ground track will continue the same distance from the edge of the field. Completion of the turn with the wings level should be accomplished at a point aligned with the upwind corner of the field.
Simultaneously, as the wings are rolled level, the proper drift correction is established with the airplane turned into the wind. This requires that the turn be less than a 90° change in heading. If the turn has been made properly, the field boundary will again appear to be one-fourth to one-half mile away. While on the crosswind leg, the wind correction angle should be adjusted as necessary to maintain a uniform distance from the field boundary.
As the next field boundary is being approached, the pilot should plan the turn onto the downwind leg. Since a wind correction angle is being held into the wind and away from the field while on the crosswind leg, this next turn will require a turn of more than 90°. Since the crosswind will become a tailwind, causing the groundspeed to increase during this turn, the bank initially should be medium and progressively increased as the turn proceeds. To complete the turn, the rollout must be timed so that the wings become level at a point aligned with the crosswind corner of the field just as the longitudinal axis of the airplane again becomes parallel to the field boundary. The distance from the field boundary should be the same as from the other sides of the field.
Usually, drift should not be encountered on the upwind or the downwind leg, but it may be difficult to find a situation where the wind is blowing exactly parallel to the field boundaries. This would make it necessary to use a slight wind correction angle on all the legs. It is important to anticipate the turns to correct for groundspeed, drift, and turning radius. When the wind is behind the airplane, the turn must be faster and steeper; when it is ahead of the airplane, the turn must be slower and shallower. These same techniques apply while flying in airport traffic patterns.
Common errors in the performance of rectangular courses are:
• Failure to adequately clear the area.
• Failure to establish proper altitude prior to entry. (Typically entering the maneuver while descending.)
• Failure to establish appropriate wind correction angle resulting in drift.
• Gaining or losing altitude.
• Poor coordination. (Typically skidding in turns from a downwind heading and slipping in turns from an upwind heading.)
• Abrupt control usage.
• Inability to adequately divide attention between airplane control and maintaining ground track.
• Improper timing in beginning and recovering from turns.
• Inadequate visual lookout for other aircraft.
S-TURNS ACROSS A ROAD
An S-turn across a road is a practice maneuver in which the airplane’s ground track describes semicircles of equal radii on each side of a selected straight line on the ground.
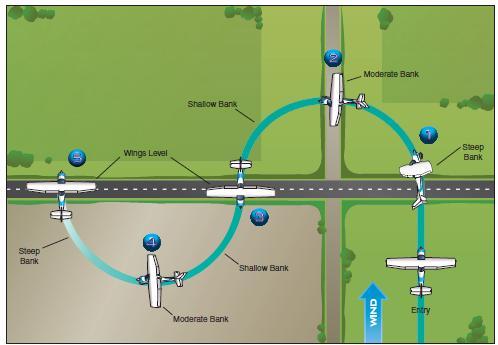
[Figure 6-5 S-Turns]
The straight line may be a road, fence, railroad, or section line that lies perpendicular to the wind, and should be of sufficient length for making a series of turns. A constant altitude should be maintained throughout the maneuver.
S-turns across a road present one of the most elementary problems in the practical application of the turn and in the correction for wind drift in turns. While the application of this maneuver is considerably less advanced in some respects than the rectangular course, it is taught after the student has been introduced to that maneuver in order that the student may have a knowledge of the correction for wind drift in straight flight along a reference line before the student attempt to correct for drift by playing a turn.
The objectives of S-turns across a road are to develop the ability to compensate for drift during turns, orient the flightpath with ground references, follow an assigned ground track, arrive at specified points on assigned headings, and divide the pilot’s attention. The maneuver consists of crossing the road at a 90° angle and immediately beginning a series of 180° turns of uniform radius in opposite directions, re-crossing the road at a 90° angle just as each 180° turn is completed.
To accomplish a constant radius ground track requires a changing roll rate and angle of bank to establish the wind correction angle. Both will increase or decrease as groundspeed increases or decreases.
The bank must be steepest when beginning the turn on the downwind side of the road and must be shallowed gradually as the turn progresses from a downwind heading to an upwind heading. On the upwind side, the turn should be started with a relatively shallow bank and then gradually steepened as the airplane turns from an upwind heading to a downwind heading.
In this maneuver, the airplane should be rolled from one bank directly into the opposite just as the reference line on the ground is crossed.
Before starting the maneuver, a straight ground reference line or road that lies 90° to the direction of the wind should be selected, then the area checked to ensure that no obstructions or other aircraft are in the immediate vicinity. The road should be approached from the upwind side, at the selected altitude on a downwind heading. When directly over the road, the first turn should be started immediately. With the airplane headed downwind, the groundspeed is greatest and the rate of departure from the road will be rapid; so the roll into the steep bank must be fairly rapid to attain the proper wind correction angle. This prevents the airplane from flying too far from the road and from establishing a ground track of excessive radius.
During the latter portion of the first 90° of turn when the airplane’s heading is changing from a downwind heading to a crosswind heading, the groundspeed becomes less and the rate of departure from the road decreases. The wind correction angle will be at the maximum when the airplane is headed directly crosswind.
After turning 90°, the airplane’s heading becomes more and more an upwind heading, the groundspeed will decrease, and the rate of closure with the road will become slower. If a constant steep bank were maintained, the airplane would turn too quickly for the slower rate of closure, and would be headed perpendicular to the road prematurely. Because of the decreasing groundspeed and rate of closure while approaching the upwind heading, it will be necessary to gradually shallow the bank during the remaining 90° of the semicircle, so that the wind correction angle is removed completely and the wings become level as the 180° turn is completed at the moment the road is reached.
At the instant the road is being crossed again, a turn in the opposite direction should be started. Since the airplane is still flying into the headwind, the groundspeed is relatively slow. Therefore, the turn will have to be started with a shallow bank so as to avoid an excessive rate of turn that would establish the maximum wind correction angle too soon. The degree of bank should be that which is necessary to attain the proper wind correction angle so the ground track describes an arc the same size as the one established on the downwind side.
Since the airplane is turning from an upwind to a downwind heading, the groundspeed will increase and after turning 90°, the rate of closure with the road will increase rapidly. Consequently, the angle of bank and rate of turn must be progressively increased so that the airplane will have turned 180° at the time it reaches the road. Again, the rollout must be timed so the airplane is in straight-and-level flight directly over and perpendicular to the road.
Throughout the maneuver a constant altitude should be maintained, and the bank should be changing constantly to effect a true semicircular ground track.
Often there is a tendency to increase the bank too rapidly during the initial part of the turn on the upwind side, which will prevent the completion of the 180° turn before re-crossing the road. This is apparent when the turn is not completed in time for the airplane to cross the road at a perpendicular angle. To avoid this error, the pilot must visualize the desired half circle ground track, and increase the bank during the early part of this turn. During the latter part of the turn, when approaching the road, the pilot must judge the closure rate properly and increase the bank accordingly, so as to cross the road perpendicular to it just as the rollout is completed.
Common errors in the performance of S-turns across a road are:
• Failure to adequately clear the area.
• Poor coordination.
• Gaining or losing altitude.
• Inability to visualize the half circle ground track.
• Poor timing in beginning and recovering from turns.
• Faulty correction for drift.
• Inadequate visual lookout for other aircraft.
TURNS AROUND A POINT
Turns around a point, as a training maneuver, is a logical extension of the principles involved in the performance of S-turns across a road. Its purposes as a training maneuver are:
• To further perfect turning technique.
• To perfect the ability to subconsciously control the airplane while dividing attention between the flightpath and ground references.
• To teach the student that the radius of a turn is a distance which is affected by the degree of bank used when turning with relation to a definite object.
• To develop a keen perception of altitude.
• To perfect the ability to correct for wind drift while in turns. In turns around a point, the airplane is flown in two or more complete circles of uniform radii or distance from a prominent ground reference point using a maximum bank of approximately 45° while maintaining a constant altitude.
The factors and principles of drift correction that are involved in S-turns are also applicable in this maneuver. As in other ground track maneuvers, a constant radius around a point will, if any wind exists, require a constantly changing angle of bank and angles of wind correction. The closer the airplane is to a direct downwind heading where the groundspeed is greatest, the steeper the bank and the faster the rate of turn required to establish the proper wind correction angle. The more nearly it is to a direct upwind heading where the groundspeed is least, the shallower the bank and the slower the rate of turn required to establish the proper wind correction angle. It follows, then, that throughout the maneuver the bank and rate of turn must be gradually varied in proportion to the groundspeed.
The point selected for turns around a point should be prominent, easily distinguished by the pilot, and yet small enough to present precise reference.
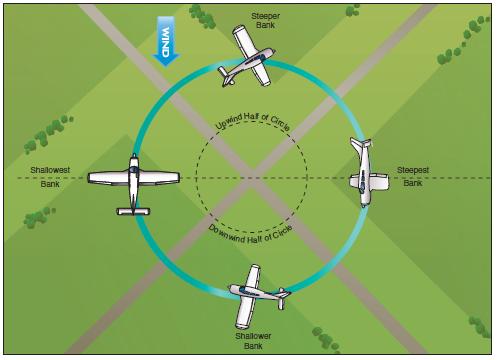
[Figure 6-6 Turns around a point]
Isolated trees, crossroads, or other similar small landmarks are usually suitable. To enter turns around a point, the airplane should be flown on a downwind heading to one side of the selected point at a distance equal to the desired radius of turn. In a high-wing airplane, the distance from the point must permit the pilot to see the point throughout the maneuver even with the wing lowered in a bank. If the radius is too large, the lowered wing will block the pilot’s view of the point.
When any significant wind exists, it will be necessary to roll into the initial bank at a rapid rate so that the steepest bank is attained abeam of the point when the airplane is headed directly downwind. By entering the maneuver while heading directly downwind, the steepest bank can be attained immediately. Thus, if a maximum bank of 45° is desired, the initial bank will be 45° if the airplane is at the correct distance from the point. Thereafter, the bank is shallowed gradually until the point is reached where the airplane is headed directly upwind. At this point, the bank should be gradually steepened until the steepest bank is again attained when heading downwind at the initial point of entry.
Just as S-turns require that the airplane be turned into the wind in addition to varying the bank, so do turns around a point. During the downwind half of the circle, the airplane’s nose is progressively turned toward the inside of the circle; during the upwind half, the nose is progressively turned toward the outside. The downwind half of the turn around the point may be compared to the downwind side of the S-turn across a road; the upwind half of the turn around a point may be compared to the upwind side of the S-turn across a road.
As the pilot becomes experienced in performing turns around a point and has a good understanding of the effects of wind drift and varying of the bank angle and wind correction angle as required, entry into the maneuver may be from any point. When entering the maneuver at a point other than downwind, however, the radius of the turn should be carefully selected, taking into account the wind velocity and groundspeed so that an excessive bank is not required later on to maintain the proper ground track. The flight instructor should place particular emphasis on the effect of an incorrect initial bank. This emphasis should continue in the performance of elementary eights.
Common errors in the performance of turns around a point are:
• Failure to adequately clear the area.
• Failure to establish appropriate bank on entry.
• Failure to recognize wind drift.
• Excessive bank and/or inadequate wind correction angle on the downwind side of the circle resulting in drift towards the reference point.
• Inadequate bank angle and/or excessive wind correction angle on the upwind side of the circle resulting in drift away from the reference point.
• Skidding turns when turning from downwind to crosswind.
• Slipping turns when turning from upwind to crosswind.
• Gaining or losing altitude.
• Inadequate visual lookout for other aircraft.
• Inability to direct attention outside the airplane while maintaining precise airplane control.
ELEMENTARY EIGHTS
An “eight” is a maneuver in which the airplane describes a path over the ground more or less in the shape of a figure “8”. In all eights except “lazy eights” the path is horizontal as though following a marked path over the ground. There are various types of eights, progressing from the elementary types to very difficult types in the advanced maneuvers. Each has its special use in teaching the student to solve a particular problem of turning with relation to the Earth, or an object on the Earth’s surface. Each type, as they advance in difficulty of accomplishment, further perfects the student’s coordination technique and requires a higher degree of subconscious flying ability. Of all the training maneuvers available to the instructor, only eights require the progressively higher degree of conscious attention to outside objects. However, the real importance of eights is in the requirement for the perfection and display of subconscious flying.
Elementary eights, specifically eights along a road, eights across a road, and eights around pylons, are variations of turns around a point, which use two points about which the airplane circles in either direction. Elementary eights are designed for the following purposes.
• To perfect turning technique.
• To develop the ability to divide attention between the actual handling of controls and an outside objective.
• To perfect the knowledge of the effect of angle of bank on radius of turn.
• To demonstrate how wind affects the path of the airplane over the ground.
• To gain experience in the visualization of the results of planning before the execution of the maneuver.
• To train the student to think and plan ahead of the airplane.
EIGHTS ALONG A ROAD
An eight along a road is a maneuver in which the ground track consists of two complete adjacent circles of equal radii on each side of a straight road or other reference line on the ground. The ground track resembles a figure 8.
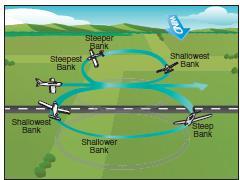
[Figure 6-7. Eights along a road]
Like the other ground reference maneuvers, its objective is to develop division of attention while compensating for drift, maintaining orientation with ground references, and maintaining a constant altitude.
Although eights along a road may be performed with the wind blowing parallel to the road or directly across the road, for simplification purposes, only the latter situation is explained since the principles involved in either case are common.
A reference line or road which is perpendicular to the wind should be selected and the airplane flown parallel to and directly above the road. Since the wind is blowing across the flightpath, the airplane will require some wind correction angle to stay directly above the road during the initial straight and level portion. Before starting the maneuver, the area should be checked to ensure clearance of obstructions and avoidance of other aircraft.
Usually, the first turn should be made toward a downwind heading starting with a medium bank. Since the airplane will be turning more and more directly downwind, the groundspeed will be gradually increasing and the rate of departing the road will tend to become faster. Thus, the bank and rate of turn is increased to establish a wind correction angle to keep the airplane from exceeding the desired distance from the road when 180° of change in direction is completed. The steepest bank is attained when the airplane is headed directly downwind.
As the airplane completes 180° of change in direction, it will be flying parallel to and using a wind correction angle toward the road with the wind acting directly perpendicular to the ground track. At this point, the pilot should visualize the remaining 180° of ground track required to return to the same place over the road from which the maneuver started.
While the turn is continued toward an upwind heading, the wind will tend to keep the airplane from reaching the road, with a decrease in groundspeed and rate of closure. The rate of turn and wind correction angle are decreased proportionately so that the road will be reached just as the 360° turn is completed. To accomplish this, the bank is decreased so that when headed directly upwind, it will be at the shallowest angle. In the last 90° of the turn, the bank may be varied to correct any previous errors in judging the returning rate and closure rate. The rollout should be timed so that the airplane will be straight and level over the starting point, with enough drift correction to hold it over the road.
After momentarily flying straight and level along the road, the airplane is then rolled into a medium bank turn in the opposite direction to begin the circle on the upwind side of the road. The wind will still be decreasing the groundspeed and trying to drift the airplane back toward the road; therefore, the bank must be decreased slowly during the first 90° change in direction in order to reach the desired distance from the road and attain the proper wind correction angle when 180° change in direction has been completed.
As the remaining 180° of turn continues, the wind becomes more of a tailwind and increases the airplane’s groundspeed. This causes the rate of closure to become faster; consequently, the angle of bank and rate of turn must be increased further to attain sufficient wind correction angle to keep the airplane from approaching the road too rapidly. The bank will be at its steepest angle when the airplane is headed directly downwind.
In the last 90° of the turn, the rate of turn should be reduced to bring the airplane over the starting point on the road. The rollout must be timed so the airplane will be straight and level, turned into the wind, and flying parallel to and over the road.
The measure of a student’s progress in the performance of eights along a road is the smoothness and accuracy of the change in bank used to counteract drift. The sooner the drift is detected and correction applied, the smaller will be the required changes. The more quickly the student can anticipate the corrections needed, the less obvious the changes will be and the more attention can be diverted to the maintenance of altitude and operation of the airplane.
Errors in coordination must be eliminated and a constant altitude maintained. Flying technique must not be allowed to suffer from the fact that the student’s attention is diverted. This technique should improve as the student becomes able to divide attention between the operation of the airplane controls and following a designated flightpath.
EIGHTS ACROSS A ROAD
This maneuver is a variation of eights along a road and involves the same principles and techniques. The primary difference is that at the completion of each loop of the figure eight, the airplane should cross an intersection of roads or a specific point on a straight road.
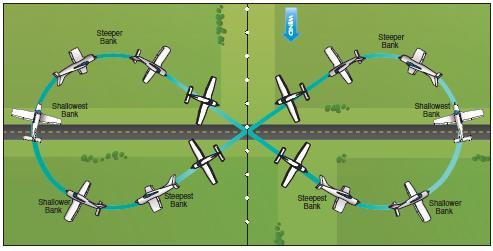
[Figure 6-8 Eights across a road]
The loops should be across the road and the wind should be perpendicular to the road. Each time the road is crossed, the crossing angle should be the same and the wings of the airplane should be level. The eights also may be performed by rolling from one bank immediately to the other, directly over the road.
EIGHTS AROUND PYLONS
This training maneuver is an application of the same principles and techniques of correcting for wind drift as used in turns around a point and the same objectives as other ground track maneuvers. In this case, two points or pylons on the ground are used as references, and turns around each pylon are made in opposite directions to follow a ground track in the form of a figure 8.
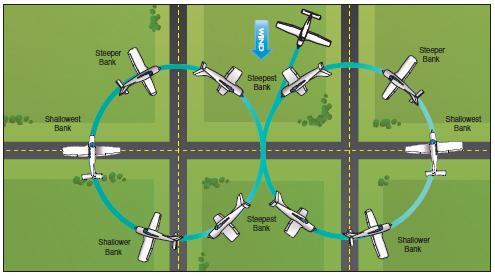
[Figure 6-9 Eights around pylons]
The pattern involves flying downwind between the pylons and upwind outside of the pylons. It may include a short period of straight-and-level flight while proceeding diagonally from one pylon to the other. The pylons selected should be on a line 90° to the direction of the wind and should be in an area away from communities, livestock, or groups of people, to avoid possible annoyance or hazards to others. The area selected should be clear of hazardous obstructions and other air traffic. Throughout the maneuver a constant altitude of at least 500 feet above the ground should be maintained.
The eight should be started with the airplane on a downwind heading when passing between the pylons. The distance between the pylons and the wind velocity will determine the initial angle of bank required to maintain a constant radius from the pylons during each turn. The steepest banks will be necessary just after each turn entry and just before the rollout from each turn where the airplane is headed downwind and the groundspeed is greatest; the shallowest banks will be when the airplane is headed directly upwind and the groundspeed is least.
The rate of bank change will depend on the wind velocity, the same as it does in S-turns and turns around a point, and the bank will be changing continuously during the turns. The adjustment of the bank angle should be gradual from the steepest bank to the shallowest bank as the airplane progressively heads into the wind, followed by a gradual increase until the steepest bank is again reached just prior to rollout. If the airplane is to proceed diagonally from one turn to the other, the rollout from each turn must be completed on the proper heading with sufficient wind correction angle to ensure that after brief straight-and-level flight, the airplane will arrive at the point where a turn of the same radius can be made around the other pylon. The straight-and-level flight segments must be tangent to both circular patterns.
Common errors in the performance of elementary eights are:
• Failure to adequately clear the area.
• Poor choice of ground reference points.
• Improper maneuver entry considering wind direction and ground reference points.
• Incorrect initial bank.
• Poor coordination during turns.
• Gaining or losing altitude.
• Loss of orientation.
• Abrupt rather than smooth changes in bank angle to counteract wind drift in turns.
• Failure to anticipate needed drift correction.
• Failure to apply needed drift correction in a timely manner.
• Failure to roll out of turns on proper heading.
• Inability to divide attention between reference points on the ground, airplane control, and scanning for other aircraft.
EIGHTS-ON-PYLONS (PYLON EIGHTS)
The pylon eight is the most advanced and most difficult of the low altitude flight training maneuvers. Because of the various techniques involved, the pylon eight is unsurpassed for teaching, developing, and testing subconscious control of the airplane.
As the pylon eight is essentially an advanced maneuver in which the pilot’s attention is directed at maintaining a pivotal position on a selected pylon, with a minimum of attention within the cockpit, it should not be introduced until the instructor is assured that the student has a complete grasp of the fundamentals. Thus, the prerequisites are the ability to make a coordinated turn without gain or loss of altitude, excellent feel of the airplane, stall recognition, relaxation with low altitude maneuvering, and an absence of the error of over concentration.
Like eights around pylons, this training maneuver also involves flying the airplane in circular paths, alternately left and right, in the form of a figure 8 around two selected points or pylons on the ground. Unlike eights around pylons, however, no attempt is made to maintain a uniform distance from the pylon. In eightson- pylons, the distance from the pylons varies if there is any wind. Instead, the airplane is flown at such a precise altitude and airspeed that a line parallel to the airplane’s lateral axis, and extending from the pilot’s eye, appears to pivot on each of the pylons.
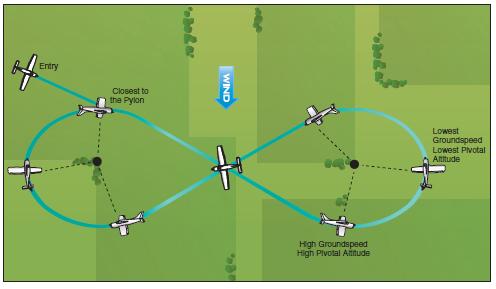
[Figure 6-10. Eights-on-pylons]
Also, unlike eights around pylons, in the performance of eights-on-pylons the degree of bank increases as the distance from the pylon decreases. The altitude that is appropriate for the airplane being flown is called the pivotal altitude and is governed by the groundspeed. While not truly a ground track maneuver as were the preceding maneuvers, the objective is similar—to develop the ability to maneuver the airplane accurately while dividing one’s attention between the flightpath and the selected points on the ground.
In explaining the performance of eights-on-pylons, the term “wingtip” is frequently considered as being synonymous with the proper reference line, or pivot point on the airplane. This interpretation is not always correct. High-wing, low-wing, sweptwing, and tapered wing airplanes, as well as those with tandem or side-by-side seating, will all present different angles from the pilot’s eye to the wingtip.
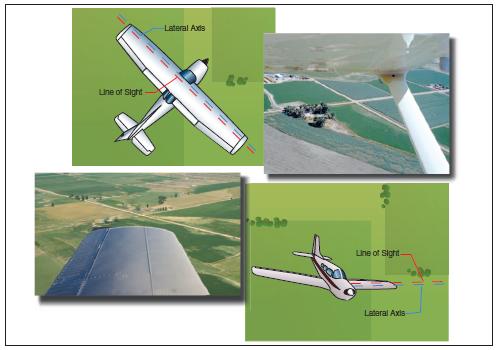
[Figure 6-11. Line of sight]
Therefore, in the correct performance of eights-on-pylons, as in other maneuvers requiring a lateral reference, the pilot should use a sighting reference line that, from eye level, parallels the lateral axis of the airplane.
The sighting point or line, while not necessarily on the wingtip itself, may be positioned in relation to the wingtip (ahead, behind, above, or below), but even then it will differ for each pilot, and from each seat in the airplane. This is especially true in tandem (fore and aft) seat airplanes. In side-by-side type airplanes, there will be very little variation in the sighting lines for different persons if those persons are seated so that the eyes of each are at approximately the same level.
An explanation of the pivotal altitude is also essential. There is a specific altitude at which, when the airplane turns at a given groundspeed, a projection of the sighting reference line to the selected point on the ground will appear to pivot on that point. Since different airplanes fly at different airspeeds, the groundspeed will be different. Therefore, each airplane will have its own pivotal altitude.
[Figure 6-12 Speed vs. pivotal altitude.]
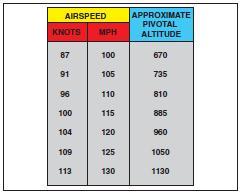
The pivotal altitude does not vary with the angle of bank being used unless the bank is steep enough to affect the groundspeed. A rule of thumb for estimating pivotal altitude in calm wind is to square the true airspeed and divide by 15 for miles per hour (m.p.h.) or 11.3 for knots. Distance from the pylon affects the angle of bank. At any altitude above that pivotal altitude, the projected reference line will appear to move rearward in a circular path in relation to the pylon. Conversely, when the airplane is below the pivotal altitude, the projected reference line will appear to move forward in a circular path.
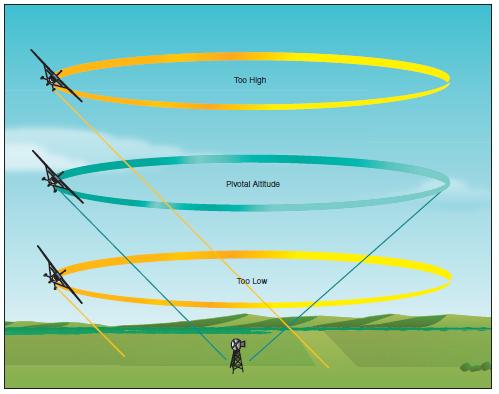
[Figure 6-13 Effect of different altitudes on pivotal altitude]
To demonstrate this, the airplane is flown at normal cruising speed, and at an altitude estimated to be below the proper pivotal altitude, and then placed in a medium-banked turn. It will be seen that the projected reference line of sight appears to move forward along the ground (pylon moves back) as the airplane turns.
A climb is then made to an altitude well above the pivotal altitude, and when the airplane is again at normal cruising speed, it is placed in a medium-banked turn. At this higher altitude, the projected reference line of sight now appears to move backward across the ground (pylon moves forward) in a direction opposite that of flight.
After the high altitude extreme has been demonstrated, the power is reduced, and a descent at cruising speed begun in a continuing medium bank around the pylon. The apparent backward travel of the projected reference line with respect to the pylon will slow down as altitude is lost, stop for an instant, then start to reverse itself, and would move forward if the descent were allowed to continue below the pivotal altitude.
The altitude at which the line of sight apparently ceased to move across the ground was the pivotal altitude. If the airplane descended below the pivotal altitude, power should be added to maintain airspeed while altitude is regained to the point at which the projected reference line moves neither backward nor forward but actually pivots on the pylon. In this way the pilot can determine the pivotal altitude of the airplane.
The pivotal altitude is critical and will change with variations in groundspeed. Since the headings throughout the turns continually vary from directly downwind to directly upwind, the groundspeed will constantly change. This will result in the proper pivotal altitude varying slightly throughout the eight. Therefore, adjustment is made for this by climbing or descending, as necessary, to hold the reference line or point on the pylons. This change in altitude will be dependent on how much the wind affects the groundspeed.
The instructor should emphasize that the elevators are the primary control for holding the pylons. Even a very slight variation in altitude effects a double correction, since in losing altitude, speed is gained, and even a slight climb reduces the airspeed. This variation in altitude, although important in holding the pylon, in most cases will be so slight as to be barely perceptible on a sensitive altimeter.
Before beginning the maneuver, the pilot should select two points on the ground along a line which lies 90° to the direction of the wind. The area in which the maneuver is to be performed should be checked for obstructions and any other air traffic, and it should be located where a disturbance to groups of people, livestock, or communities will not result.
The selection of proper pylons is of importance to good eights-on-pylons. They should be sufficiently prominent to be readily seen by the pilot when completing the turn around one pylon and heading for the next, and should be adequately spaced to provide time for planning the turns and yet not cause unnecessary straight-and-level flight between the pylons. The selected pylons should also be at the same elevation, since differences of over a very few feet will necessitate climbing or descending between each turn.
For uniformity, the eight is usually begun by flying diagonally crosswind between the pylons to a point downwind from the first pylon so that the first turn can be made into the wind. As the airplane approaches a position where the pylon appears to be just ahead of the wingtip, the turn should be started by lowering the upwind wing to place the pilot’s line of sight reference on the pylon. As the turn is continued, the line of sight reference can be held on the pylon by gradually increasing the bank. The reference line should appear to pivot on the pylon. As the airplane heads into the wind, the groundspeed decreases; consequently, the pivotal altitude is lower and the airplane must descend to hold the reference line on the pylon. As the turn progresses on the upwind side of the pylon, the wind becomes more of a crosswind. Since a constant distance from the pylon is not required on this maneuver, no correction to counteract drifting should be applied during the turns.
If the reference line appears to move ahead of the pylon, the pilot should increase altitude. If the reference line appears to move behind the pylon, the pilot should decrease altitude. Varying rudder pressure to yaw the airplane and force the wing and reference line forward or backward to the pylon is a dangerous technique and must not be attempted.
As the airplane turns toward a downwind heading, the rollout from the turn should be started to allow the airplane to proceed diagonally to a point on the downwind side of the second pylon. The rollout must be completed in the proper wind correction angle to correct for wind drift, so that the airplane will arrive at a point downwind from the second pylon the same distance it was from the first pylon at the beginning of the maneuver.
Upon reaching that point, a turn is started in the opposite direction by lowering the upwind wing to again place the pilot’s line of sight reference on the pylon. The turn is then continued just as in the turn around the first pylon but in the opposite direction.
With prompt correction, and a very fine control touch, it should be possible to hold the projection of the reference line directly on the pylon even in a stiff wind. Corrections for temporary variations, such as those caused by gusts or inattention, may be made by shallowing the bank to fly relatively straight to bring forward a lagging wing, or by steepening the bank temporarily to turn back a wing which has crept ahead. With practice, these corrections will become so slight as to be barely noticeable. These variations are apparent from the movement of the wingtips long before they are discernable on the altimeter.
Pylon eights are performed at bank angles ranging from shallow to steep.
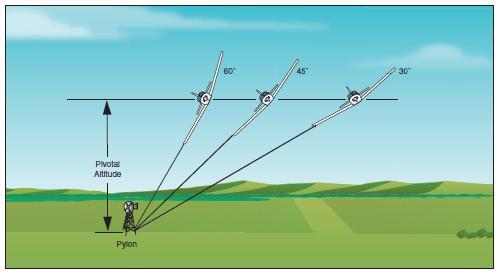 [Figure 6-14. Bank angle vs. pivotal altitude]
The student should understand that the bank chosen will not alter the pivotal altitude. As proficiency is gained, the instructor should increase the complexity of the maneuver by directing the student to enter at a distance from the pylon that will result in a specific bank angle at the steepest point in the pylon turn.
The most common error in attempting to hold a pylon is incorrect use of the rudder. When the projection of the reference line moves forward with respect to the pylon, many pilots will tend to press the inside rudder to yaw the wing backward. When the reference line moves behind the pylon, they will press the outside rudder to yaw the wing forward. The rudder is to be used only as a coordination control.
Other common errors in the performance of eights-onpylons (pylon eights) are:
• Failure to adequately clear the area.
• Skidding or slipping in turns (whether trying to hold the pylon with rudder or not).
• Excessive gain or loss of altitude.
• Over concentration on the pylon and failure to observe traffic.
• Poor choice of pylons.
• Not entering the pylon turns into the wind.
• Failure to assume a heading when flying between pylons that will compensate sufficiently for drift.
• Failure to time the bank so that the turn entry is completed with the pylon in position.
• Abrupt control usage.
• Inability to select pivotal altitude.