Airplane Ground Schools
Knowledge of Flying is Our passion.
Serving the General Aviation Community
SEAPLANE PREFLIGHT INSPECTION
Begin the preflight inspection with a thorough review of the existing local weather, destination weather, and water conditions. This weather evaluation should include the direction and speed of the wind to determine their effects on takeoffs, landings, and other water operations.
The preflight inspection of a seaplane is somewhat different from that of a landplane. Inspecting a seaplane on the water is complicated by the need to reposition the seaplane to gain access to all parts of the airframe. On the other hand, preflighting a seaplane on land may create certain challenges because the wings and tail surfaces may be out of reach and difficult to inspect when standing on the ground.
The following preflight description omits many items that are identical in landplanes and seaplanes in order to emphasize the differences between the two procedures. The process and the equipment to be checked vary from airplane to airplane, but the following description provides a general idea of the preflight inspection for a typical high wing, single-engine floatplane. As always, follow the procedures recommended in the Airplane Flight Manual (AFM) or Pilot’s Operating Handbook (POH). If the seaplane is in the water during the preflight, take a good look at how it sits on the surface. This can provide vital clues to the presence of water in the floats, as well as to the position of the center of gravity. Is the seaplane lower in the water than it should be, given its load? Is one wing lower than the other, or is one float riding noticeably lower in the water than the other? Are the sterns of the floats low in the water? If any of these signs are present, suspect a flooded float compartment or an improperly loaded seaplane. At more than 8 pounds per gallon, even a relatively small amount of water in a float compartment can seriously affect both useful load and center of gravity (CG). In the cockpit, verify that the throttle is closed, the mixture control is full lean, and the magnetos and master switch are turned off. Lower the water rudders and check for any stiffness or binding in the action of the cables. Check that necessary marine and safety equipment, such as life vests, lines (ropes), anchors, and paddles are present, in good condition, and stowed correctly. Obtain the bilge pump and fuel sample cup.
Standing on the front of the float, inspect the propeller, forward fuselage, and wing. Check the usual items, working from the nose toward the tail. Water spray damage to the propeller looks similar to gravel damage, and must be corrected by a mechanic. Check the oil and fuel levels and sample the fuel, ensuring that it is the proper grade and free of contaminants. Naturally, the most likely contaminant in seaplane fuel tanks is water. Pay extra attention to the lubrication of all hinges. Not only does lubrication make movement easier, but a good coating of the proper lubricant keeps water out and prevents corrosion. Look for any blistering or bubbling of the paint, which may indicate corrosion of the metal underneath. Check the security of the float struts and their attachment fittings. Be careful moving along the float, and pay attention to wing struts, mooring lines, and other obstacles. If the seaplane is on land, do not stand on the floats aft of the step or the seaplane may tip back.
Next, inspect the float itself. Water forces can create very high loads and lead to cumulative damage. Look carefully for signs of stress, such as distortion or buckling of the skin, dents, or loose rivets. The chines should form a continuous smooth curve from front to back, and there should be no bends or kinks along the flange. If the floats are made of fiberglass or composite materials, look carefully for surface cracks, abrasions, or signs of delamination. Check the spreader bars between the floats, and look at the bracing wires and their fittings. Any sign of movement, loose fasteners, broken welds, or a bracing wire that is noticeably tighter or looser than the others is cause for concern. Check for signs of corrosion, especially if the seaplane has been operated in salt water. Although corrosion is 4-2 less of an issue with composite floats, be sure to check metal fittings and fasteners.
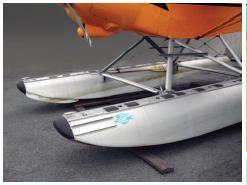
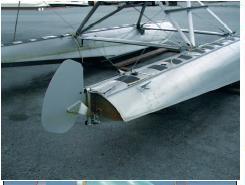
[Figure 4-1 A preflight inspection with the seaplane on land
provides an opportunity to thoroughly examine the floats
below the waterline. Note the spray rail on the inboard chine
of the far float in this photo]
Use the bilge pump to remove any accumulated water from each watertight compartment. The high dynamic water pressure and the physical stresses of takeoffs and landings can momentarily open tiny gaps between float components, allowing small amounts of water to enter. Conversely, sitting idle in the water also results in a small amount of seepage and condensation. While it is normal to pump a modest amount of water from each compartment, more than a quart or so may indicate a problem that should be checked by a qualified aircraft mechanic experienced in working on floats. Normal is a relative term, and experience will indicate how much water is too much.
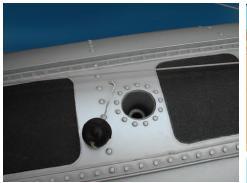
[Figure 4-2 Bilge pump openings are closed with a soft rubber ball]
If pumping does not remove any water from a compartment, the tube running from the bilge pump opening to the bottom of the compartment may be damaged or loose. If this is the case, there could be a significant amount of water in the compartment, but the pump is unable to pull it up.
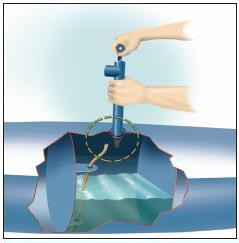
[Figure 4-3 Be suspicious if pumping does not remove a
small amount of water. If the bilge pump tube is damaged,
there may be water in the compartment that the pump cannot
remove]
Be sure to replace the plugs firmly in each bilge pump opening. At the stern of the float, check the aft bulkhead, or transom. This area is susceptible to damage from the water rudder moving beyond its normal range of travel. Carefully check the skin for any pinholes or signs of damage from contact with the water rudder or hinge hardware. Inspect the water rudder retraction and steering mechanism and look over the water rudder for any damage. Remove any water weeds or other debris lodged in the water rudder assembly. Check the water rudder cables that run from the float to the fuselage.
[Figure 4-4 Inspect the water rudders, cables, springs, and pulleys for proper operation]
Figure 4-1. A preflight inspection with the seaplane on land provides an opportunity to thoroughly examine the floats below the waterline. Note the spray rail on the inboard chine of the far float in this photo. Figure 4-2. Bilge pump openings are closed with a soft rubber ball. Figure 4-3. Be suspicious if pumping does not remove a small amount of water. If the bilge pump tube is damaged, there may be water in the compartment that the pump cannot remove. Figure 4-4. Inspect the water rudders, cables, springs, and pulleys for proper operation. 4-3 engine. With oil pressure checked, idle r.p.m. set, and the seaplane taxiing in the desired direction, the pilot then fastens the seatbelt and shoulder harness, secures the door, and continues preparing for takeoff.
When a qualified person is available to help launch the seaplane, the pilot can strap in, close the door, and start the engine while the helper holds the seaplane. In most situations, the helper should position the seaplane so it is facing outward, perpendicular to the dock. It is very important that the helper have experience in the proper handling of seaplanes, otherwise an innocent mistake could cause serious damage to the seaplane or to nearby boats, structures, or other seaplanes.
TAXIING AND SAILING
One major difference between taxiing a landplane and taxiing a seaplane is that the seaplane is virtually always in motion, and there are no brakes. When idling, a landplane usually remains motionless, and when moving, brakes can be used to control its speed or bring it to a stop. But once untied, the seaplane floats freely along the water surface and constantly moves due to the forces of wind, water currents, propeller thrust, and inertia. It is important that the seaplane pilot be familiar with the existing wind and water conditions, plan an effective course of action, and mentally stay ahead of the seaplane. There are three basic positions or attitudes used in moving a seaplane on the water, differentiated by the position of the floats and the speed of the seaplane through the water. They are the idling or displacement position, the plowing position, and the planing or step position.
IDLING POSITION
In the idling position or displacement position, the buoyancy of the floats supports the entire weight of the seaplane and it remains in an attitude similar to being at rest on the water. Engine r.p.m. is kept as low as possible to control speed, to keep the engine from overheating, and to minimize spray. In almost all circumstances, the elevator control should be held all the way back to keep the nose as high as possible and minimize spray damage to the propeller. This also improves maneuverability by keeping more of the water rudder underwater. The exception is when a strong tailwind component or heavy swells could allow the wind to lift the tail and possibly flip the seaplane over. In such conditions, hold the elevator control forward enough to keep the tail down.
[Figure 4-5 Idling position.The engine is at idle r.p.m., the seaplane moves slowly, the attitude is nearly level, and buoyancy supports
the seaplane]
To check the empennage area, untie the seaplane, gently push it away from the dock, and turn it 90° so the tail extends over the dock. Take care not to let the water rudders contact the dock. In addition to the normal empennage inspection, check the cables that connect the water rudders to the air rudder. With the air rudder centered, look at the back of the floats to see that the water rudders are also centered. (On some systems, retracting the water rudders disengages them from the air rudder.) If the seaplane has a ventral fin to improve directional stability, this is the time to check it. Spray frequently douses the rear portion of the seaplane, so be particularly alert for signs of corrosion in this area. With the empennage inspection complete, continue turning the seaplane to bring the other float against the dock, and tie it to the dock. Inspect the fuselage, wing, and float on this side. If the seaplane has a door on only one side, turn the seaplane so the door is adjacent to the dock when the inspection is complete. When air temperatures drop toward freezing, ice becomes a matter for concern. Inspect the float compartments and water rudders for ice, and consider the possibility of airframe icing during takeoff due to freezing spray. Water expands as it freezes, and this expansion can cause serious damage to floats. A large amount of water expanding inside a float could cause seams to burst, but even a tiny amount of water freezing and expanding inside a seam can cause severe leakage problems. Many operators who remove their floats for the winter store them upside down with the compartment covers off to allow thorough drainage. When the time comes to reinstall the floats, it’s a good idea to look for any bugs or small animals that might have made a home in the floats.
STARTING THE ENGINE
Compared to a landplane, a seaplane’s starting procedures are somewhat different. Before starting the engine, the seaplane usually needs to be pushed away from the dock, and quite often, it is the pilot who pushes off. Therefore, the pilot should perform as many of the items on the starting checklist as possible prior to shoving off. This includes briefing passengers and seeing that they have fastened their seatbelts. The passenger briefing should include procedures for evacuation, the use of flotation gear, and the location and operation of regular and emergency exits. All passengers are required to be familiar with the operation of seatbelts and shoulder harnesses (if installed). When the engine is primed and ready to start, the pilot leaves the cockpit, shoves off, returns to the pilot’s seat, quickly turns on the master switch and magnetos, verifies that the propeller area is clear, and starts the 4-4 Use the idling or displacement position for most taxiing operations, and keep speeds below 6-7 knots to minimize spray getting to the propeller. It is especially important to taxi at low speed in congested or confined areas because inertia forces at higher speeds allow the seaplane to coast farther and serious damage can result from even minor collisions. Cross boat wakes or swells at a 45° angle, if possible, to minimize pitching or rolling and the possibility of an upset.
PLOWING POSITION
Applying power causes the center of buoyancy to shift back, due to increased hydrodynamic pressure on the bottoms of the floats. This places more of the seaplane’s weight behind the step, and because the floats are narrower toward the rear, the sterns sink farther into the water. Holding the elevator full up also helps push the tail down due to the increased airflow from the propeller. The plowing position creates high drag, requiring a relatively large amount of power for a modest gain in speed. Because of the higher r.p.m., the propeller may pick up spray even though the nose is high. The higher engine power combined with low cooling airflow creates a danger of heat buildup in the engine. Monitor engine temperature carefully to avoid overheating. Taxiing in the plowing position is not recommended. It is usually just the transitional phase between idle taxi and planing.
[Figure 4-6 Plowing position]
PLANING OR STEP POSITION
In the planing position, most of the seaplane’s weight is supported by hydrodynamic lift rather than the buoyancy of the floats. (Because of the wing’s speed through the air, aerodynamic lift may also be supporting some of the weight of the seaplane.) Hydrodynamic lift depends on movement through the water, like a water ski. As the float moves faster through the water, it becomes possible to change the pitch attitude to raise the rear portions of the floats clear of the water. This greatly reduces water drag, allowing the seaplane to accelerate to lift-off speed. This position is most often called on the step.
[Figure 4-7 On the step. The attitude is nearly level, and the weight of the seaplane is supported mostly by hydrodynamic lift.
Behind the step, the floats are essentially clear of the water]
There is one pitch attitude that produces the minimum amount of drag when the seaplane is on the step. An experienced seaplane pilot can easily find this “sweet spot” or “slick spot” by the feel of the floats on the water, but the beginning seaplane pilot usually needs to rely on gauging the position of the nose on the horizon. If the nose is considerably high, the rear portions of the floats contact the water, drag increases, and the seaplane tends to start settling back into more of a plowing position. If the nose is held only slightly higher than the ideal planing attitude, the seaplane may remain on the step but take much longer to accelerate to rotation speed. On the other hand, if the nose is too low, more of the front portion of the float contacts the water, creating more drag. This condition is called dragging, and as the nose pulls down and the seaplane begins to slow, it can sometimes feel similar to applying the brakes in a landplane.
To continue to taxi on the step instead of taking off, reduce the power as the seaplane is eased over onto the step. More power is required to taxi with a heavy load. However, 65 to 70 percent of maximum power is a good starting point.
Taxiing on the step is a useful technique for covering long distances on the water. Carefully reducing power as the seaplane comes onto the step stops acceleration so that the seaplane maintains a high speed across the water, but remains well below flying speed. At these speeds, the water rudders must be retracted to prevent damage, but there is plenty of airflow for the air rudder. With the seaplane on the step, gentle turns can be made by using the air rudder and the ailerons, always maintaining a precise planing attitude with elevator. The ailerons are positioned into the turn, except when aileron into the wind is needed to keep the upwind wing from lifting.
Step taxiing should only be attempted in areas where the pilot is confident there is sufficient water depth, no floating debris, no hidden obstructions, and no other water traffic nearby. It can be difficult to spot floating hazards at high speeds, and an encounter with a floating log or other obstruction could tear open a float. Your seaplane is not as maneuverable as craft that were designed for the water, so avoiding other vessels is much more difficult. Besides the obvious danger of collision, other water traffic creates dangerous wakes, which are a much more frequent cause of damage. If you see that you are going to cross a wake, reduce power to idle and idle taxi across it, preferably at an angle. Never try to step taxi in shallow water. If the floats touch bottom at high speed, the sudden drag is likely to flip the seaplane.
From either the plowing or the step position, when power is reduced to idle, the seaplane decelerates quite rapidly and eventually assumes the displacement or idle position. Be careful to use proper flight control pressures during the deceleration phase because as weight is transferred toward the front of the floats and drag increases, some seaplanes have a tendency to nose over. Control this with proper use of the elevator. TURNS At low speeds and in light winds, make turns using the water rudders, which move in conjunction with the air rudder. As with a landplane, the ailerons should be positioned to minimize the possibility of the wind lifting a wing. In most airplanes, left turns are somewhat easier and can be made tighter than right turns because of torque. If water rudders have the proper amount of movement, most seaplanes can be turned within a radius less than the span of the wing in calm conditions or a light breeze. Water rudders are usually more effective at slow speeds because they are acting in comparatively undisturbed water. At higher speeds, the stern of the float churns the adjacent water, causing the water rudder to become less effective. The dynamic pressure of the water at high speeds may tend to force the water rudders to swing up or retract, and the pounding can cause damage. For these reasons, water rudders should be retracted whenever the seaplane is moving at high speed.
The weathervaning tendency is more evident in seaplanes, and the taxiing seaplane pilot must be constantly aware of the wind’s effect on the ability to maneuver. In stronger winds, weathervaning forces may make it difficult to turn Figure 4-7. On the step. The attitude is nearly level, and the weight of the seaplane is supported mostly by hydrodynamic lift. Behind the step, the floats are essentially clear of the water. 4-6 downwind. Often a short burst of power provides sufficient air over the rudder to overcome weathervaning. Since the elevator is held all the way up, the airflow also forces the tail down, making the water rudders more effective. Short bursts of power are preferable to a longer, continuous power application. With continuous power, the seaplane accelerates, increasing the turn radius. The churning of the water in the wake of the floats also makes the water rudders less effective. At the same time, low cooling airflow may cause the engine to heat up.
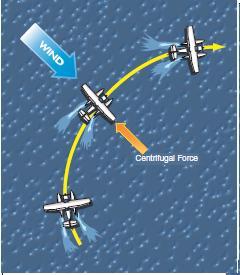
During a high speed taxiing turn, centrifugal force tends to tip the seaplane toward the outside of the turn. When turning from an upwind heading to a downwind heading, the wind force acts in opposition to centrifugal force, helping stabilize the seaplane. On the other hand, when turning from downwind to upwind, the wind force against the fuselage and the underside of the wing increases the tendency for the seaplane to lean to the outside of the turn, forcing the downwind float deeper into the water. In a tight turn or in strong winds, the combination of these two forces may be sufficient to tip the seaplane to the extent that the downwind float submerges or the outside wing drags in the water, and may even flip the seaplane onto its back. The further the seaplane tips, the greater the effect of the crosswind, as the wing presents more vertical area to the wind force.
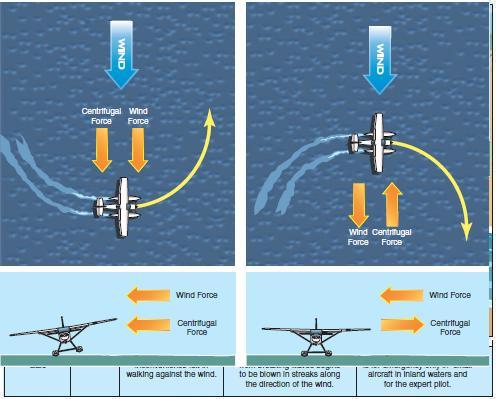
[Figure 4-8 Wind effects in turns. When the wind and centrifugal force act in the same direction, the downwind float can be
forced underwater. When the wind is countered by centrifugal force, the seaplane is more stable]
When making a turn into the wind from a crosswind condition, often all that is necessary to complete the turn is to neutralize the air rudder and allow the seaplane to weathervane into the wind. If taxiing directly downwind, use the air rudder momentarily to get the turn started, then let the wind complete the turn. Sometimes opposite rudder may be needed to control the rate of turn.
Stronger winds may make turns from upwind to downwind more difficult. The plow turn is one technique for turning downwind when other methods are inadequate, but this maneuver is only effective in certain seaplanes. It takes advantage of the same factor that reduces a floatplane’s yaw stability in flight: the large vertical area of the floats forward of the center of gravity. In the plowing attitude, the front portion of each float comes out of the water, presenting a large vertical surface for the wind to act upon. This tends to neutralize the weathervaning force, allowing the turn to proceed. At the same time, the center of buoyancy shifts back. Since this is the axis around which the seaplane pivots while Wind Force Centrifugal Force Wind Force Centrifugal Force Centrifugal Force Wind Force Centrifugal Force Wind Force Figure 4-8. Wind effects in turns. When the wind and centrifugal force act in the same direction, the downwind float can be forced underwater. When the wind is countered by centrifugal force, the seaplane is more stable. 4-7 on the water, more of the fuselage is now forward of the axis and less is behind, further decreasing the weathervaning tendency. In some seaplanes, this change is so pronounced in the plowing attitude that they experience reverse weathervaning, and tend to turn downwind rather than into the wind. Experienced seaplane pilots can sometimes use the throttle as a turning device in high wind conditions by increasing power to cause a nose-up position when turning downwind, and decreasing power to allow the seaplane to weathervane into the wind.
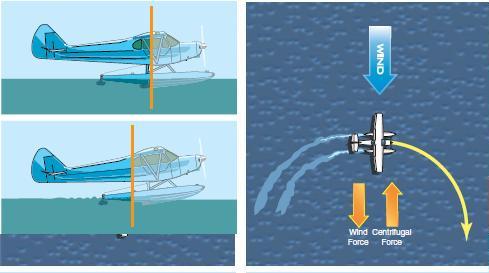
[Figure 4-9 In the plowing position, the exposed area at the
front of the floats, combined with the rearward shift of the
center of buoyancy, can help to counteract the weathervaning
tendency]
To execute a plow turn, begin with a turn to the right, then use the weathervaning force combined with full left rudder to turn back to the left. As the seaplane passes its original upwind heading, add enough power to place it into the plow position, continuing the turn with the rudder. As the seaplane comes to the downwind heading, reduce power and return to an idle taxi. From above, the path of the turn looks like a question mark.
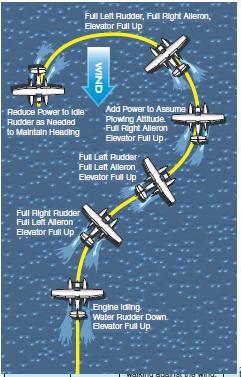
[Figure 4-10 Plow turn from upwind to downwind]
Plow turns are useful only in very limited situations because they expose the pilot to a number of potential dangers. They should not be attempted in rough water or gusty conditions. Floatplanes are least stable when in the plowing attitude, and are very susceptible to capsizing. In spite of the nose-high attitude, the high power setting often results in spray damage to the propeller. In most windy situations, it is much safer to sail the seaplane backward (as explained in the next section) rather than attempt a plow turn.
When the seaplane is on the step, turns involve careful balancing of several competing forces. As the rate of turn increases, the floats are being forced to move somewhat sideways through the water, and they resist this sideways motion with drag, much like an airplane fuselage in a skidding turn. More power is required to overcome this drag and maintain planing speed. This skidding force also tends to roll the seaplane toward the outside of the turn, driving the outside float deeper into the water and adding more drag on that side. To prevent this, use aileron into the turn to keep the outside wing from dropping. Once full aileron into the step turn is applied, any further roll to the outside can only be stopped by reducing the rate of turn, so pay careful attention to the angle of the wings and the feel of the water drag on the floats to catch any indication that the outside float is starting to submerge. When stopping a step turn, always return to a straight path before reducing power.
At step taxi speeds, the centrifugal force in a turn is far greater than at idle taxi speed, so the forces involved in turning from downwind to upwind are proportionately more dangerous, especially in strong winds. Chances are, by the time a pilot discovers that the outside float is going under, the accident is almost inevitable. However, immediate full rudder out of the turn and power reduction may save the situation by reversing Engine Idling Water Rudder Down Elevator Full Up Add Power to Assume Plowing Attitude. Full Right Aileron Elevator Full Up Full Right Rudder Full Left Aileron Elevator Full Up Full Left Rudder Full Left Aileron Elevator Full Up Reduce Power to Idle Rudder as Needed to Maintain Heading Full Left Rudder, Full Right Aileron, Elevator Full Up Figure 4-9. In the plowing position, the exposed area at the front of the floats, combined with the rearward shift of the center of buoyancy, can help to counteract the weathervaning tendency. Figure 4-10. Plow turn from upwind to downwind. 4-8 the centrifugal force and allowing the buried float to come up.
SAILING
Landplane pilots are accustomed to taxiing by pointing the nose of the airplane in the desired direction and rolling forward. In seaplane operations, there are often occasions when it is easier and safer to move the seaplane backward or to one side because wind, water conditions, or limited space make it impractical to attempt a turn. If there is a significant wind, a seaplane can be guided into a space that might seem extremely cramped to an inexperienced pilot. Sailing is a method of guiding the seaplane on the water using the wind as the main motive force. It is a useful technique for maneuvering in situations where conventional taxiing is undesirable or impossible. Since the seaplane automatically aligns itself so the nose points into the wind, sailing in a seaplane usually means moving backward.
In light wind conditions with the engine idling or off, a seaplane naturally weathervanes into the wind. If the pilot uses the air rudder to swing the tail a few degrees, the seaplane sails backward in the direction the tail is pointed. This is due to the keel effect of the floats, which tends to push the seaplane in the direction the sterns of the floats are pointing. In this situation, lift the water rudders, since their action is counter to what is desired. When sailing like this, the sterns of the floats have become the front, as far as the water is concerned, but the rear portions of the floats are smaller and therefore not as buoyant. If the wind is strong and speed starts to build up, the sterns of the floats could start to submerge and dig into the water. Combined with the lifting force of the wind over the wings, the seaplane could conceivably flip over backward, so use full forward elevator to keep the sterns of the floats up and the seaplane’s nose down. Adding power can also help keep the floats from submerging.
If enough engine power is used to exactly cancel the backward motion caused by the wind, the seaplane is not moving relative to the water, so keel effect disappears. However, turning the fuselage a few degrees left or right provides a surface for the wind to push against, so the wind will drive the seaplane sideways in the direction the nose is pointed. Combining these techniques, a skilled pilot can sail a seaplane around obstacles and into confined docking spaces.
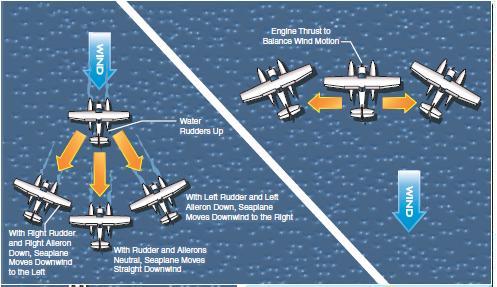
[Figure 4-11 When the seaplane moves through the water, keel effect drives it in the direction the tail is pointed. With no motion
through the water, the wind pressure on the fuselage pushes the seaplane toward the side the nose is pointed.]
Figure 4-12 shows how to position the controls for the desired direction of motion in light or strong winds. With the engine off, lowering the wing flaps and opening the cabin doors increases the air resistance and thus adds to the effect of the wind. This increases sailing speed but may reduce the effect of the air rudder. If sailing with the engine off results in too much motion downwind, but an idling engine produces too much thrust, adding carburetor heat or turning off one magneto can reduce the engine power slightly. Avoid using carburetor heat or running on one magneto for extended periods. Instead, start the engine briefly to slow down.
Where currents are a factor, such as in strong tidal flows or a fast flowing river, sailing techniques must incorporate the movement of the water along with the wind. The current may be a help or a hindrance, or change from a help to a hindrance when the pilot attempts to change direction. The keel effect only works when the floats are moving through the water. If the current is moving the seaplane, there may be little or no motion relative to the water, even though the seaplane is moving relative to the shore. Using wind, current, and thrust to track the desired course requires careful planning and a thorough understanding of the various forces at work.
With the engine shut down, most flying boats sail backward and toward whichever side the nose is pointed, regardless of wind velocity, because the hull does not provide as much keel effect as floats in proportion to the side area of the seaplane above the waterline. To sail directly backward in a flying boat, release the controls and let the wind steer. Sailing is an essential part of seaplane operation. Since each type of seaplane has its own peculiarities, practice sailing until thoroughly familiar with that particular type. Practice in large bodies of water such as lakes or bays, but sufficiently close to a prominent object in order to evaluate performance.
Before taxiing into a confined area, carefully evaluate the effects of the wind and current, otherwise the seaplane may be driven into obstructions. With a seaplane of average size and power at idle, a water current of 5 knots can offset a wind velocity of 25 knots in the opposite direction. This means that a 5 knot current will carry the seaplane against a 25 knot wind. Differential power can be used to aid steering in multiengine seaplanes.
PORPOISING
Porpoising is a rhythmic pitching motion caused by dynamic instability in forces along the float bottoms while on the step. An incorrect planing attitude sets off a cyclic oscillation that steadily increases in amplitude unless the proper pitch attitude is reestablished.

[Figure 4-13 Porpoising increases in amplitude if not corrected promptly]
A seaplane travels smoothly across the water on the step only if the floats or hull remain within a moderately tolerant range of pitch angles. If the nose is held too low during planing, water pressure in the form of a small crest or wall builds up under the bows of the floats. Eventually, the crest becomes large enough that the fronts of the floats ride up over the crest, pitching the bows upward. As the step passes over the crest, the floats tip forward abruptly, digging the bows a little deeper into the water. This builds a new crest in front of the floats, resulting in another oscillation. Each oscillation becomes increasingly severe, and if not corrected, will cause the seaplane to nose into the water, resulting in extensive damage or possible capsizing. A second type of porpoising can occur if the nose is held too high while on the step. Porpoising can also cause a premature lift-off with an extremely high angle of attack, which can result in a stall and a subsequent nose-down drop into the water. Porpoising occurs during the takeoff run if the planing angle is not properly controlled with elevator pressure just after passing through the “hump” speed. The pitching created when the seaplane encounters a swell system while on the step can also initiate porpoising. Usually, porpoising does not start until the seaplane has passed a degree or two beyond the acceptable planing angle range, and Right Aileron Up Left Rudder Left Aileron Down Direction of Motion with Engine Idling Direction of Motion with Power Just Balancing Wind Direction of Motion with Enough Power to Overcome Wind Direction of Motion with Power Off Figure 4-12. By balancing wind force and engine thrust, it is possible to sail sideways or diagonally forward. Of course, reversing the control positions from those illustrated permits the pilot to sail to the opposite side. Figure 4-13. Porpoising increases in amplitude if not corrected promptly. 4-10 does not cease until after the seaplane has passed out of the critical range by a degree or two.
If porpoising occurs due to a nose-low planing attitude, stop it by applying timely back pressure on the elevator control to prevent the bows of the floats from digging into the water. The back pressure must be applied and maintained until porpoising stops. If porpoising does not stop by the time the second oscillation occurs, reduce the power to idle and hold the elevator control back firmly so the seaplane settles onto the water with no further instability. Never try to “chase” the oscillations, as this usually makes them worse and results in an accident.
Pilots must learn and practice the correct pitch attitudes for takeoff, planing, and landing for each type of seaplane until there is no doubt as to the proper angles for the various maneuvers. The upper and lower limits of these pitch angles are established by the design of the seaplane; however, changing the seaplane’s gross weight, wing flap position, or center of gravity location also changes these limits. Increased weight increases the displacement of the floats or hull and raises the lower limit considerably. Extending the wing flaps frequently trims the seaplane to the lower limit at lower speeds, and may lower the upper limit at high speeds. A forward center of gravity increases the possibility of high angle porpoising, especially during landing.
SKIPPING
Skipping is a form of instability that may occur when landing at excessive speed with the nose at too high a pitch angle. This nose-up attitude places the seaplane at the upper trim limit of stability and causes the seaplane to enter a cyclic oscillation when touching the water, which results in the seaplane skipping across the surface. This action is similar to skipping flat stones across the water. Skipping can also occur by crossing a boat wake while taxiing on the step or during a takeoff. Sometimes the new seaplane pilot confuses a skip with a porpoise, but the pilot’s body sensations can quickly distinguish between the two. Askip gives the body vertical “G” forces, similar to bouncing a landplane. Porpoising is a rocking chair type forward and aft motion feeling.
To correct for skipping, first increase back pressure on the elevator control and add sufficient power to prevent the floats from contacting the water. Then establish the proper pitch attitude and reduce the power gradually to allow the seaplane to settle gently onto the water. Skipping oscillations do not tend to increase in amplitude, as in porpoising, but they do subject the floats and airframe to unnecessary pounding and can lead to porpoising.
TAKEOFFS
A seaplane takeoff may be divided into four distinct phases:
(1) The displacement phase,
(2) the hump or plowing phase,
(3) the planing or on the step phase, and
(4) the lift-off.
The displacement phase should be familiar from the taxiing discussion. During idle taxi, the displacement of water supports nearly all of the seaplane’s weight. The weight of the seaplane forces the floats down into the water until a volume that weighs exactly as much as the seaplane has been displaced. The surface area of the float below the waterline is called the wetted area, and it varies depending on the seaplane’s weight. An empty seaplane has less wetted area than when it is fully loaded. Wetted area is a major factor in the creation of drag as the seaplane moves through the water.
As power is applied, the floats move faster through the water. The water resists this motion, creating drag. The forward portion of the float is shaped to transform the horizontal movement through the water into an upward lifting force by diverting the water downward. Newton’s Third Law of Motion states that for every action, there is an equal and opposite reaction, and in this case, pushing water downward results in an upward force known as hydrodynamic lift.
In the plowing phase, hydrodynamic lift begins pushing up the front of the floats, raising the seaplane’s nose and moving the center of buoyancy aft. This, combined with the downward pressure on the tail generated by holding the elevator control all the way back, forces the rear part of the floats deeper into the water. This creates more wetted area and consequently more drag, and explains why the seaplane accelerates so slowly during this part of the takeoff.
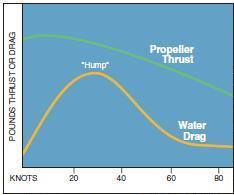
[Figure 4-14. This graph shows water drag and propeller thrust during a takeoff run.]
This resistance typically reaches its peak just before the floats are placed into a planing attitude. Figure 4-14 shows a graph of the drag forces at work during a seaplane takeoff run. The area of greatest resistance is referred to as the hump because of the shape of the water drag curve. During the plowing phase, the increasing water speed generates more and more hydrodynamic lift. With more of the weight supported by hydrodynamic lift, proportionately less is supported by displacement and the floats are able to rise in the water. As they do, there is less wetted area to cause drag, which allows more acceleration, which in turn increases hydrodynamic lift. There is a limit to how far this cycle can go, however, because as speed builds, so does the amount of drag on the remaining wetted area. Drag increases as the square of speed, and eventually drag forces would balance the power output of the engine and the seaplane would continue along the surface without further acceleration.
Seaplanes have been built with sufficient power to accelerate to takeoff speed this way, but fortunately the step was invented, and it makes further acceleration possible without additional power. After passing over the hump, the seaplane is traveling fast enough that its weight can be supported entirely by hydrodynamic lift. Relaxing the back pressure on the elevator control allows the float to rock up onto the step, and lifts the 4-11 rear portions of the floats clear of the water. This eliminates all of the wetted area aft of the step, along with the associated drag.
As further acceleration takes place, the flight controls become more responsive, just as in a landplane. Elevator deflection is gradually reduced to hold the required planing attitude. As the seaplane continues to accelerate, more and more weight is being supported by the aerodynamic lift of the wings and water resistance continues to decrease. When all of the weight is transferred to the wings, the seaplane becomes airborne.
Several factors greatly increase the water drag or resistance, such as heavy loading of the seaplane or glassy water conditions. In extreme cases, the drag may exceed the available thrust and prevent the seaplane from becoming airborne. This is particularly true when operating in areas with high density altitudes (high elevations/ high temperatures) where the engine cannot develop full rated power. For this reason the pilot should practice takeoffs using only partial power to simulate the longer takeoff runs needed when operating where the density altitude is high and/or the seaplane is heavily loaded. This practice should be conducted under the supervision of an experienced seaplane instructor, and in accordance with any cautions or limitations in the AFM/POH. Plan for the additional takeoff area required, as well as the flatter angle of climb after takeoff, and allow plenty of room for error.
Use all of the available cues to verify the wind direction. Besides reading the water, pick up clues to the wind’s direction from wind indicators and streamers on the masts of moored boats, flags on flagpoles, or rising smoke. A boat moored to a buoy points into the wind, but be aware that it may have a stern anchor as well, preventing it from pointing into the wind. Waterfowl almost always align themselves facing into the wind.
Naturally, be sure you have enough room for takeoff. The landing distance of a seaplane is much shorter than that required for takeoff, and many pilots have landed in areas that have turned out to be too short for takeoff. If you suspect that the available distance may be inadequate, consider reducing weight by leaving some of your load behind or wait for more favorable weather conditions. Atakeoff that would be dangerous on a hot, still afternoon might be accomplished safely on the following morning, with cooler temperatures and a brisk wind.
In addition to wind, consider the effects of the current when choosing the direction for takeoff. Keep in mind that when taxiing in the same direction as the current, directional control may be reduced because the seaplane is not moving as quickly through the water. In rivers or tidal flows, make crosswind or calm wind takeoffs in the same direction as the current. This reduces the water forces on the floats. Suppose the seaplane lifts off at 50 knots and the current is 3 knots. If winds are calm, the seaplane needs a water speed of 47 knots to take off downstream, but must accelerate to a water speed of 53 knots to become airborne against the current. This difference of 6 knots requires a longer time on the water and generates more stress on the floats. The situation becomes more complex when wind is a factor. If the wind is blowing against the current, its speed can help the wings develop lift sooner, but will raise higher waves on the surface. If the wind is in the same direction as the current, at what point does the speed of the wind make it more worthwhile to take off against the current? In the previous example, a wind velocity of 3 knots would exactly cancel the benefit of the current, since the air and water would be moving at the same speed. In most situations, take off into the wind if the speed of the wind is greater than the current.
Unlike landplane operations at airports, many other activities are permitted in waters where seaplane operations are conducted. Seaplane pilots encounter a variety of objects on the water, some of which are nearly submerged and difficult to see. These include items that are stationary, such as pilings and buoys, and those that are mobile, like logs, swimmers, water skiers, and a variety of watercraft. Before beginning the takeoff, it is a good practice to taxi along the intended takeoff path to check for any hazardous objects or obstructions.
Make absolutely sure the takeoff path ahead is free of boats, swimmers, and other water traffic, and be sure it will remain so for the duration of the takeoff run. Powerboats, wind-surfers, and jet-skis can move quickly and change direction abruptly. As the seaplane’s nose comes up with the application of full power, the view ahead may be completely blocked by the cowling. Check to the sides and behind the seaplane as well as straight ahead, since many watercraft move much faster than the normal taxi speed and may be passing the seaplane from behind. In addition to the vessels themselves, also scan for their wakes and try to anticipate where the wakes will be during takeoff. Operators of motorboats and other watercraft often do not realize the hazard caused by moving their vessels across the takeoff path of a seaplane. It is usually better to delay takeoff and wait for the swells to pass rather than encountering them at high speed. Even small swells can cause dangerous pitching or rolling for a seaplane, so taxi across them at an angle rather than head-on. Remember to check for other air traffic and make any appropriate radio calls.
Be sure to use the pre-takeoff checklist on every takeoff. All checks are performed as the seaplane taxies, including the engine runup. Hold the elevator control all the way back throughout the runup to minimize spray around the propeller. If there is significant wind, let the seaplane turn into the wind for the runup. As r.p.m. increases, the nose rises into the plowing position and the seaplane begins to accelerate. Since this is a relatively unstable position, performing the runup into the wind minimizes the possibility of crosswinds, rough water, or gusts upsetting the seaplane. Waste no time during the runup checks, but be thorough and precise. Taxi speed will drop as soon as the power is reduced.
Water rudders are normally retracted before applying takeoff power. The buffeting and dynamic water pressure during a takeoff can cause serious damage if the water rudders are left down.
As full power is applied during takeoff in most seaplanes, torque and P-factor tend to force the left float down into the water. Right rudder pressure helps to maintain a straight takeoff path. In some cases, left aileron may also help to counter the tendency to turn left at low speeds, by increasing drag on the right side of the seaplane.
Density altitude is particularly important in seaplane flying. High, hot, and humid conditions reduce engine power and propeller efficiency, and the seaplane must also attain a higher water speed in order to generate the lift required for takeoff. This increase in water speed means overcoming additional water drag. All of these factors combine to increase takeoff distances and decrease climb performance. In high density altitude conditions, consider not only the length of the water run, but the room required for a safe climbout as well.
The land area around a body of water is invariably somewhat higher than the water surface. Tall trees are common along shorelines, and in many areas, steep or mountainous terrain rises from the water’s edge. Be certain the departure path allows sufficient room for safe terrain clearance or for a wide climbing turn back over the water.
There are specific takeoff techniques for different wind and water situations. Large water areas almost always allow a takeoff into the wind, but there are occasionally circumstances where a crosswind or downwind takeoff may be more appropriate. Over the years, techniques have evolved for handling rough water or a glassy smooth surface. Knowing and practicing these techniques not only keep skills polished so they are available when needed, they also increase overall proficiency and add to the enjoyment of seaplane flying.
NORMAL TAKEOFFS
Make normal takeoffs into the wind. Once the wind direction is determined and the takeoff path chosen, configure the seaplane and perform all of the pre-takeoff checks while taxiing to the takeoff position. Verify that the takeoff will not interfere with other traffic, either on the water’s surface or in the air.
Hold the elevator control all the way back and apply full power smoothly and quickly, maintaining directional control with the rudder. When the nose reaches its highest point, ease the back pressure to allow the seaplane to come up on the step. Establish the optimum planing attitude and allow the seaplane to accelerate to lift-off speed. In most cases, the seaplane lifts off as it reaches flying speed. Occasionally it may be necessary to gently help the floats unstick by either using some aileron to lift one float out of the water or by adding a small amount of back pressure on the elevator control. Once off the water, the seaplane accelerates more quickly. When a safe airspeed is achieved, establish the pitch attitude for the best rate of climb (VY) and complete the climb checklist. Turn as necessary to avoid overflying noise-sensitive areas, and reduce power as appropriate to minimize noise.
CROSSWIND TAKEOFFS
In restricted or limited areas such as canals or narrow rivers, it is not always possible to take off or land directly into the wind. Therefore, acquiring skill in crosswind techniques enhances the safety of seaplane operation. Crosswinds present special difficulties for seaplane pilots. The same force that acts to lift the upwind wing also increases weight on the downwind float, forcing it deeper into the water and increasing drag on that side. Keep in mind that the allowable crosswind component for a floatplane may be significantly less than for the equivalent landplane.
A crosswind has the same effect on a seaplane during takeoff as on a landplane, that is, it tends to push the seaplane sideways across the takeoff path, which imposes side loads on the landing gear. In addition, wind pressure on the vertical tail causes the seaplane to try to weathervane into the wind.
At the beginning of the takeoff roll in a landplane, drift and weathervaning tendencies are resisted by the friction of the tires against the runway, usually assisted by nosewheel steering, or in some cases even differential braking. The objective in a crosswind takeoff is the same in landplanes and seaplanes: to counteract drift and minimize the side loads on the landing gear.
The sideways drifting force, acting through the seaplane’s center of gravity, is opposed by the resistance of the water against the side area of the floats. This creates a force that tends to tip the seaplane sideways, pushing the downwind float deeper into the water and lifting the upwind wing. The partly submerged float has even more resistance to sideways motion, and the upwind wing displays more vertical surface area to the wind, intensifying the problem. Without intervention by the pilot, this tipping could continue until the seaplane capsizes.
During a takeoff in stiff crosswinds, weathervaning forces can cause an uncontrolled turn to begin. As the turn develops, the addition of centrifugal force acting outward from the turn aggravates the problem. The keels of the floats resist the sideways force, and the upwind wing tends to lift. If strong enough, the combination of the wind and centrifugal force may tip the seaplane to the point where the downwind float submerges and subsequently the wingtip may strike the water. This is known as a waterloop, and the dynamics are similar to a groundloop on land. Although some damage occurs when the wingtip hits the ground during a groundloop, the consequences of plunging a wingtip underwater in a seaplane can be disastrous. In a fully developed waterloop, the seaplane may be severely damaged or may capsize. Despite these dire possibilities, crosswind takeoffs can be accomplished safely by exercising good judgment and proper piloting technique.
Since there are no clear reference lines for directional guidance, such as those on airport runways, it can be difficult to quickly detect side drift on water. Waves may make it appear that the water is moving sideways, but remember that although the wind moves the waves, the water remains nearly stationary. The waves are simply an up-and-down motion of the water surface— the water itself is not moving sideways. To maintain a straight path through the water, pick a spot on the shore as an aim point for the takeoff run. On the other hand, some crosswind techniques involve describing a curved path through the water. Experience will help determine which technique is most appropriate for a given situation.
CONTROLLED WEATHERVANING
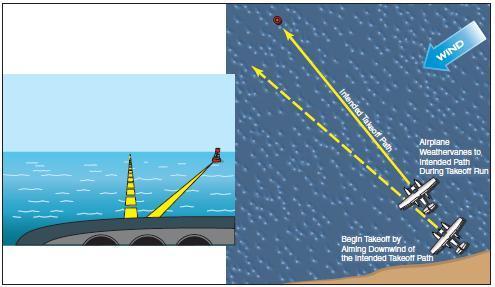
[Figure 4-15 Anticipate weathervaning by leading the aim point, setting up a somewhat downwind heading prior to starting the
takeoff. Choose an aim point that does not move, such as a buoy or a point on the far shore]
In light winds, it is easy to counteract the weathervaning tendency during the early part of the takeoff run by creating an allowance for it from the beginning. Prior to adding takeoff power, use the water rudders to set up a heading somewhat downwind of the aim point. The angle will depend on the speed of the wind—the higher Begin Takeoff by Aiming Downwind of the Intended Takeoff Path Airplane Weathervanes to Intended Path During Takeoff Run Intended Takeoff Path Figure 4-15. Anticipate weathervaning by leading the aim point, setting up a somewhat downwind heading prior to starting the takeoff. Choose an aim point that does not move, such as a buoy or a point on the far shore. 4-14 the wind, the greater the lead angle. Create just enough of a lead angle so that when the water rudders are raised and power is applied, the seaplane weathervanes to the desired heading during the time it gains enough speed to make the air rudder and ailerons effective. As the seaplane transitions to the plowing attitude, the weathervaning tendency decreases as the fronts of the floats come out of the water, adding vertical surface area at the front of the seaplane. Use full aileron into the wind as the takeoff run begins, and maintain enough aileron to keep the upwind wing from lifting as airspeed builds.
USING WATER RUDDERS
Another technique for maintaining a straight takeoff path involves leaving the water rudders down to assist with steering. Using the water rudders provides added directional control until the aerodynamic controls become effective.
To use this technique, align the seaplane with the aim point on the shore, hold full aileron into the wind, and apply takeoff power. As the seaplane accelerates, use enough aileron pressure to keep the upwind wing down. The downwind float should lift free of the water first. After lift-off, make a coordinated turn to establish the proper crab angle for the climb, and retract the water rudders.
This takeoff technique subjects the water rudders to high dynamic water pressures and could cause damage. Be sure to comply with the advice of the float manufacturer.
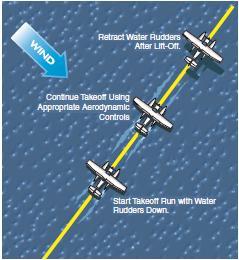
[Figure 4-16 Remember to retract the water rudders after
takeoff to avoid damage during the next landing]
DOWNWIND ARC
The other crosswind takeoff technique results in a curved path across the water, starting somewhat into the wind and turning gradually downwind during the takeoff run. This reduces the actual crosswind component at the beginning of the takeoff, when the seaplane is most susceptible to weathervaning. As the aerodynamic controls become more effective, the pilot balances the side loads imposed by the wind with the skidding force of an intentional turn, as always, holding the upwind wing down with the ailerons.
[Figure 4-17 The downwind arc balances wind force with centrifugal
force.]
The pilot plans a curved path and follows this arc to produce sufficient centrifugal force so that the seaplane tends to lean outward against the wind force. During the run, the pilot can adjust the rate of turn by varying rudder pressure, thereby increasing or decreasing the centrifugal force to compensate for a changing wind force. In practice, it is quite simple to plan sufficient curvature of the takeoff path to cancel out strong crosswinds, even on very narrow rivers. Note that the tightest part of the downwind arc is when the seaplane is traveling at slower speeds.
The last portion of a crosswind takeoff is somewhat similar to a landplane. Use ailerons to lift the downwind wing, providing a sideways component of lift to counter the effect of the crosswind. This means that the downwind float lifts off first. Be careful not to drop the upwind wing so far that it touches the water. When using a straight takeoff path, keep the nose on the aim point with opposite rudder and maintain the proper step attitude until the other float lifts off. Unlike a landplane, there is usually no advantage in holding the seaplane on the water past normal lift-off speed, and doing so may expose the floats to unnecessary pounding as they splash through the waves. Once airborne, make a coordinated turn to the crab angle that results in a straight track toward the aim point, and pitch to obtain the desired climb airspeed.
Again, experience plays an important part in successful operation during crosswinds. It is essential that all seaplane pilots have thorough knowledge and skill in these maneuvers.
DOWNWIND TAKEOFFS
Downwind takeoffs in a seaplane present a somewhat different set of concerns. If the winds are light, the water is smooth, and there is plenty of room, a downwind takeoff may be more convenient than a long downwind taxi to a position that would allow a takeoff into the wind. In any airplane, the wing needs to attain a specific airspeed in order to fly, and that indicated airspeed is the same regardless of wind direction.
However, when taking off downwind, obtaining the airspeed means accelerating to a proportionately higher groundspeed. Naturally, the takeoff run is longer because the wings must first be accelerated to the speed of the wind, then accelerated to the correct airspeed to generate the lift required for takeoff. So far, this is identical to what occurs with a landplane during a downwind takeoff. But in addition, a downwind takeoff run in a seaplane is further lengthened by the factor of float drag. The speed of the floats in the water corresponds to the higher groundspeed required in a landplane, but the drag of the floats increases as the square of their speed. This increase in drag is much greater than the increase in rolling resistance of tires and wheel bearings in a landplane. A tailwind may lengthen the seaplane’s takeoff distance much more dramatically than the same tailwind in a landplane.
Nevertheless, there are situations in which a downwind takeoff may be more favorable than taking off into the wind. If there is a long lake with mountains at the upwind end and a clear departure path at the other, a downwind takeoff might be warranted. Likewise, noise considerations and thoughtfulness might prompt a downwind takeoff away from a populated shore area if plenty of water area is available. In areas where the current favors a downwind takeoff, the advantage gained from the movement of the water can more than compensate for the wind penalty. Keep in mind that overcoming the current creates far more drag than accelerating a few extra knots downwind with the current. In all cases, safety requires a thorough knowledge of the takeoff performance of the seaplane.
GLASSY WATER TAKEOFFS
Glassy water makes takeoff more difficult in two ways. The smoothness of the surface has the effect of increasing drag, making acceleration and lift-off more difficult. This can feel as if there is suction between the water and the floats. A little surface roughness actually helps break the contact between the floats and the water by introducing turbulence and air bubbles between water and the float bottoms. The intermittent contact between floats and water at the moment of lift-off cuts drag and allows the seaplane to accelerate while still obtaining some hydrodynamic lift, but glassy water maintains a continuous drag force. Once airborne, the lack of visual cues to the seaplane’s height above the water can create a potentially dangerous situation unless a positive rate of climb is maintained.
The takeoff technique is identical to a normal takeoff until the seaplane is on the step and nearly at flying speed. At this point, the water drag may prevent the seaplane from accelerating the last few knots to lift-off speed. To reduce float drag and break the grip of the water, the pilot applies enough aileron pressure to lift one float just out of the water and allows the seaplane to continue to accelerate on the step of the other float until lift-off. By allowing the seaplane to turn slightly in the direction the aileron is being held rather than holding opposite rudder to maintain a straight course, considerable aerodynamic drag is eliminated, aiding acceleration and lift-off. When using this technique, be careful not to lift the wing so much that the opposite wing contacts the water. Obviously, this would have serious consequences. Once the seaplane lifts off, establish a positive rate of climb to prevent inadvertently flying back into the water.
Another technique that aids glassy water takeoffs entails roughening the surface a little. By taxiing around in a circle, the wake of the seaplane spreads and reflects from shorelines, creating a slightly rougher surface that can provide some visual depth and help the floats break free during takeoff.
Occasionally a pilot may have difficulty getting the seaplane onto the step during a glassy water takeoff, particularly if the seaplane is loaded to its maximum authorized weight. The floats support additional weight by displacing more water; they sink deeper into the water when at rest. Naturally, this wets more surface area, which equates to increased water drag when the seaplane begins moving, compared to a lightly loaded situation. Under these conditions the seaplane may assume a plowing position when full power is applied, but may not develop sufficient hydrodynamic lift to get on the step due to the additional water drag. The careful seaplane pilot always plans ahead and considers the possibility of aborting the takeoff.
Nonetheless, if these conditions are not too excessive, the takeoff often can be accomplished using the following technique.
After the nose rises to the highest point in the plowing position with full back elevator pressure, decrease back pressure somewhat. The nose will drop if the seaplane has attained enough speed to be on the verge of attaining the step position. After a few seconds, the nose will rise again. At the instant it starts to rise, reinforce the rise by again applying firm back pressure. As soon as the nose reaches its maximum height, repeat the entire routine. After several repetitions, the nose attains greater height and speed increases. If the elevator control is then pushed well forward and held there, the seaplane will slowly flatten out on the step and the controls may then be eased back to the neutral position. Once on the step, the remainder of the takeoff run follows the usual glassy water procedure.
ROUGH WATER TAKEOFFS
The objective in a rough water takeoff is similar to that of a rough or soft field takeoff in a landplane: to transfer the weight of the airplane to the wings as soon as possible, get airborne at a minimum airspeed, accelerate in ground effect to a safe climb speed, and climb out.
In most cases an experienced seaplane pilot can safely take off in rough water, but a beginner should not attempt to take off if the waves are too high. Using the proper procedure during rough water operation lessens the abuse of the floats, as well as the entire seaplane.
During rough water takeoffs, open the throttle to takeoff power just as the floats begin rising on a wave. This prevents the float bows from digging into the water and helps keep the spray away from the propeller. Apply a little more back elevator pressure than on a smooth water takeoff. This raises the nose to a higher angle and helps keep the float bows clear of the water.
Once on the step, the seaplane can begin to bounce from one wave crest to the next, raising its nose higher with each bounce, so each successive wave is struck with increasing severity. To correct this situation and to prevent a stall, smooth elevator pressures should be used to set up a fairly constant pitch attitude that allows the seaplane to skim across each successive wave as speed increases. Maintain control pressure to prevent the float bows from being pushed under the water surface, and to keep the seaplane from being thrown into the air at a high pitch angle and low airspeed. Fortunately, a takeoff in rough water is generally accomplished within a short time because if there is sufficient wind to make water rough, the wind is also strong enough to produce aerodynamic lift earlier and enable the seaplane to become airborne quickly.
The relationship of the spacing of the waves to the length of the floats is very important. If the wavelength is less than half the length of the floats, the seaplane is always supported by at least two waves at a time. If the wavelength is longer than the floats, only one wave at a time supports the seaplane. This creates dangerous pitching motions, and takeoff should not be attempted in this situation.
With respect to water roughness, consider the effect of a strong water current flowing against the wind. If the current is moving at 10 knots and the wind is blowing the opposite direction at 15 knots, the relative velocity between the water and the wind is 25 knots, and the waves will be as high as those produced in still water by a wind of 25 knots.
The advisability of canceling a proposed flight because of rough water depends on the size of the seaplane, wing loading, power loading, and, most importantly, the pilot’s ability. As a general rule, if the height of the waves from trough to crest is more than half the height of the floats from keel to deck, takeoffs should not be attempted except by expert seaplane pilots. Chapter 8, Emergency Open Sea Operations, contains more information on rough water operations.
CONFINED AREA TAKEOFFS
If operating from a small body of water, an acceptable technique may be to begin the takeoff run while headed downwind, and then turning to complete the takeoff into the wind. This may be done by putting the seaplane on the step while on a downwind heading, then making a step turn into the wind to complete the takeoff. Exercise caution when using this technique since wind and centrifugal force are acting in the same direction and could result in the seaplane tipping over. The water area must be large enough to permit a wide step turn, and winds should be light.
In some cases, the water area may be adequate but surrounding high terrain creates a confined area. The terrain may also block winds, resulting in a glassy water situation as well. Such conditions may lead to a dangerous situation, especially when combined with a high density altitude. Even though landing was not difficult, careful planning is necessary for the takeoff. If the departure path leads over high terrain, consider circling back over the water after takeoff to gain altitude. If air temperatures have increased since landing, make the proper allowance for reduced takeoff performance due to the change in density altitude. Think about spending the night to take advantage of cooler temperatures the next morning. Although the decision may be difficult, consider leaving some cargo or passengers behind if takeoff safety is in question. It is far better to make a second trip to pick them up than to end your takeoff in the trees along the shore.
List below the topics for Seaplane, Skiplane and Float Airplane types .
Seaplane Rules, Regulations, and Aids for Navigation
Water Characteristics and Seaplane Base Operations
Seaplane Operations Preflight and Takeoffs