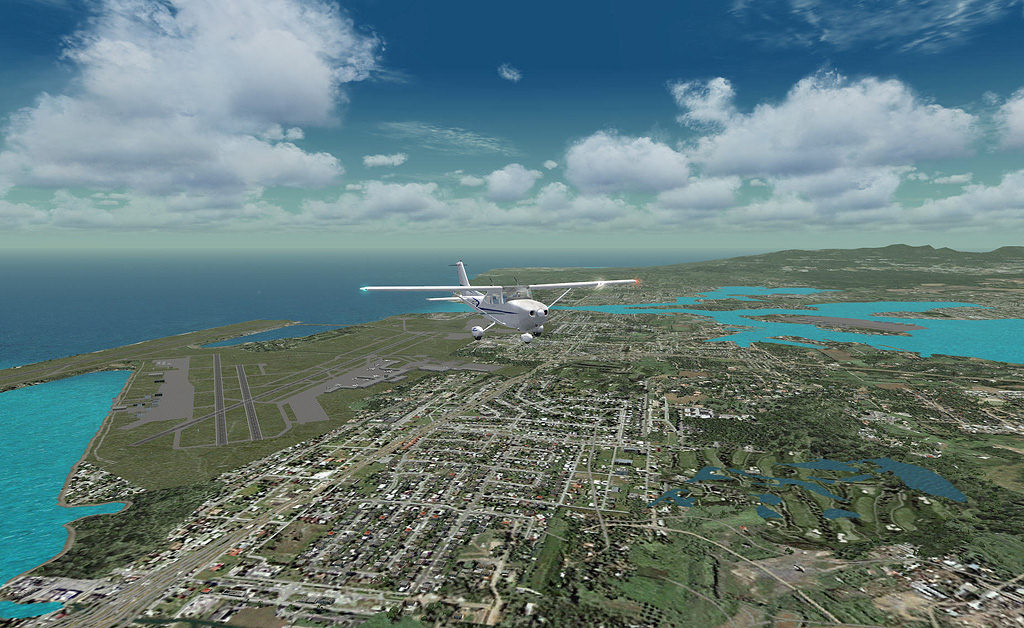
Airplane Ground Schools
Knowledge of Flying is Our passion.
Serving the General Aviation Community
NIGHT VISION
Generally, most pilots are poorly informed about night vision. Human eyes never function as effectively at night as the eyes of animals with nocturnal habits, but if humans learn how to use their eyes correctly and know their limitations, night vision can be improved significantly. There are several reasons for training to use the eyes correctly.
One reason is the mind and eyes act as a team for a person to see well; both team members must be used effectively. The construction of the eyes is such that to see at night they are used differently than during the day. Therefore, it is important to understand the eye’s construction and how the eye is affected by darkness.
Innumerable light-sensitive nerves, called “cones” and “rods,” are located at the back of the eye or retina, a layer upon which all images are focused. These nerves connect to the cells of the optic nerve, which transmits messages directly to the brain. The cones are located in the center of the retina, and the rods are concentrated in a ring around the cones.
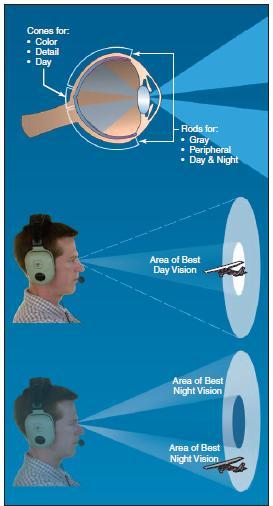
[Figure 10-1 Rods and cones]
The function of the cones is to detect color, details, and faraway objects. The rods function when something is seen out of the corner of the eye or peripheral vision. They detect objects, particularly those that are moving, but do not give detail or color—only shades of gray. Both the cones and the rods are used for vision during daylight.
Although there is not a clear-cut division of function, the rods make night vision possible. The rods and cones function in daylight and in moonlight, but in the absence of normal light, the process of night vision is placed almost entirely on the rods.
The fact that the rods are distributed in a band around the cones and do not lie directly behind the pupils makes off-center viewing (looking to one side of an object) important during night flight. During daylight, an object can be seen best by looking directly at it, but at night a scanning procedure to permit off-center viewing of the object is more effective. Therefore, the pilot should consciously practice this scanning procedure to improve night vision.
The eye’s adaptation to darkness is another important aspect of night vision. When a dark room is entered, it is difficult to see anything until the eyes become adjusted to the darkness. Most everyone has experienced this after entering a darkened movie theater. In this process, the pupils of the eyes first enlarge to receive as much of the available light as possible. After approximately 5 to 10 minutes, the cones become adjusted to the dim light and the eyes become 100 times more sensitive to the light than they were before the dark room was entered. Much more time, about 30 minutes, is needed for the rods to become adjusted to darkness, but when they do adjust, they are about 100,000 times more sensitive to light than they were in the lighted area. After the adaptation process is complete, much more can be seen, especially if the eyes are used correctly.
After the eyes have adapted to the dark, the entire process is reversed when entering a lighted room. The eyes are first dazzled by the brightness, but become completely adjusted in a very few seconds, thereby losing their adaptation to the dark. Now, if the dark room is reentered, the eyes again go through the long process of adapting to the darkness. The pilot before and during night flight must consider the adaptation process of the eyes. First, the eyes should be allowed to adapt to the low level of light and then they should be kept adapted. After the eyes have become adapted to the darkness, the pilot should avoid exposing them to any bright white light that will cause temporary blindness and could result in serious consequences.
Temporary blindness, caused by an unusually bright light, may result in illusions or after images until the eyes recover from the brightness. The brain creates these illusions reported by the eyes. This results in misjudging or incorrectly identifying objects, such as mistaking slanted clouds for the horizon or populated areas for a landing field. Vertigo is experienced as a feeling of dizziness and imbalance that can create or increase illusions. The illusions seem very real and pilots at every level of experience and skill can be affected. Recognizing that the brain and eyes can play tricks in this manner is the best protection for flying at night.
Good eyesight depends upon physical condition. Fatigue, colds, vitamin deficiency, alcohol, stimulants, smoking, or medication can seriously impair vision. Keeping these facts in mind and taking adequate precautions should safeguard night vision.
In addition to the principles previously discussed, the following items will aid in increasing night vision effectiveness.
• Adapt the eyes to darkness prior to flight and keep them adapted. About 30 minutes is needed to adjust the eyes to maximum efficiency after exposure to a bright light.
• If oxygen is available, use it during night flying. Keep in mind that a significant deterioration in night vision can occur at cabin altitudes as low as 5,000 feet.
• Close one eye when exposed to bright light to help avoid the blinding effect.
• Do not wear sunglasses after sunset.
• Move the eyes more slowly than in daylight.
• Blink the eyes if they become blurred.
• Concentrate on seeing objects.
• Force the eyes to view off center.
• Maintain good physical condition.
• Avoid smoking, drinking, and using drugs that may be harmful.
NIGHT ILLUSIONS
In addition to night vision limitations, pilots should be aware that night illusions could cause confusion and concerns during night flying. The following discussion covers some of the common situations that cause illusions associated with night flying.
On a clear night, distant stationary lights can be mistaken for stars or other aircraft. Even the northern lights can confuse a pilot and indicate a false horizon. Certain geometrical patterns of ground lights, such as a freeway, runway, approach, or even lights on a moving train can cause confusion. Dark nights tend to eliminate reference to a visual horizon. As a result, pilots need to rely less on outside references at night and more on flight and navigation instruments.
Visual autokinesis can occur when a pilot stares at a single light source for several seconds on a dark night. The result is that the light will appear to be moving. The autokinesis effect will not occur if the pilot expands the visual field. It is a good procedure not to become fixed on one source of light.
Distractions and problems can result from a flickering light in the cockpit, anticollision light, strobe lights, or other aircraft lights and can cause flicker vertigo. If continuous, the possible physical reactions can be nausea, dizziness, grogginess, unconsciousness, headaches, or confusion. The pilot should try to eliminate any light source causing blinking or flickering problems in the cockpit.
A black-hole approach occurs when the landing is made from over water or non-lighted terrain where the runway lights are the only source of light. Without peripheral visual cues to help, pilots will have trouble orientating themselves relative to Earth. The runway can seem out of position (downsloping or upsloping) and in the worse case, results in landing short of the runway. If an electronic glide slope or visual approach slope indicator (VASI) is available, it should be used. If navigation aids (NAVAIDs) are unavailable, careful attention should be given to using the flight instruments to assist in maintaining orientation and a normal approach. If at any time the pilot is unsure of his or her position or attitude, a go-around should be executed.
Bright runway and approach lighting systems, especially where few lights illuminate the surrounding terrain, may create the illusion of less distance to the runway. In this situation, the tendency is to fly a higher approach. Also, when flying over terrain with only a few lights, it will make the runway recede or appear farther away. With this situation, the tendency is common to fly a lower-than-normal approach. If the runway has a city in the distance on higher terrain, the tendency will be to fly a lower-than-normal approach. A good review of the airfield layout and boundaries before initiating any approach will help the pilot maintain a safe approach angle.
Illusions created by runway lights result in a variety of problems. Bright lights or bold colors advance the runway, making it appear closer.
Night landings are further complicated by the difficulty of judging distance and the possibility of confusing approach and runway lights. For example, when a double row of approach lights joins the boundary lights of the runway, there can be confusion where the approach lights terminate and runway lights begin. Under certain conditions, approach lights can make the aircraft seem higher in a turn to final, than when its wings are level.
PILOT EQUIPMENT
Before beginning a night flight, carefully consider personal equipment that should be readily available during the flight. At least one reliable flashlight is recommended as standard equipment on all night flights. Remember to place a spare set of batteries in the flight kit. A D-cell size flashlight with a bulb switching mechanism that can be used to select white or red light is preferable. The white light is used while performing the preflight visual inspection of the airplane, and the red light is used when performing cockpit operations. Since the red light is nonglaring, it will not impair night vision. Some pilots prefer two flashlights, one with a white light for preflight, and the other a penlight type with a red light. The latter can be suspended by a string from around the neck to ensure the light is always readily available. One word of caution; if a red light is used for reading an aeronautical chart, the red features of the chart will not show up.
Aeronautical charts are essential for night cross-country flight and, if the intended course is near the edge of the chart, the adjacent chart should also be available. The lights of cities and towns can be seen at surprising distances at night, and if this adjacent chart is not available to identify those landmarks, confusion could result. Regardless of the equipment used, organization of the cockpit eases the burden on the pilot and enhances safety.
AIRPLANE EQUIPMENT AND LIGHTING
Title 14 of the Code of Federal Regulations (14 CFR) part 91 specifies the basic minimum airplane equipment required for night flight. This equipment includes only basic instruments, lights, electrical energy source, and spare fuses.
The standard instruments required for instrument flight under 14 CFR part 91 are a valuable asset for aircraft control at night. An anticollision light system, including a flashing or rotating beacon and position lights, is required airplane equipment. Airplane position lights are arranged similar to those of boats and ships. A red light is positioned on the left wingtip, a green light on the right wingtip, and a white light on the tail.
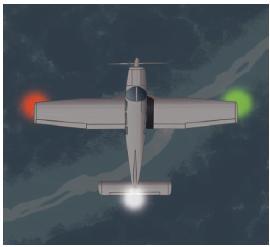
[Figure 10-2 Position lights.]
Figure 10-2. Position lights. This arrangement provides a means by which pilots can determine the general direction of movement of other airplanes in flight. If both a red and green light of another aircraft were observed, the airplane would be flying toward the pilot, and could be on a collision course.
Landing lights are not only useful for taxi, takeoffs, and landings, but also provide a means by which airplanes can be seen at night by other pilots. The Federal Aviation Administration (FAA) has initiated a voluntary pilot safety program called “Operation Lights ON.” The “lights on” idea is to enhance the “see and be seen” concept of averting collisions both in the air and on the ground, and to reduce the potential for bird strikes. Pilots are encouraged to turn on their landing lights when operating within 10 miles of an airport. This is for both day and night, or in conditions of reduced visibility. This should also be done in areas where flocks of birds may be expected. Although turning on aircraft lights supports the see and be seen concept, pilots should not become complacent about keeping a sharp lookout for other aircraft. Most aircraft lights blend in with the stars or the lights of the cities at night and go unnoticed unless a conscious effort is made to distinguish them from other lights.
AIRPORT AND NAVIGATION LIGHTING AIDS
The lighting systems used for airports, runways, obstructions, and other visual aids at night are other important aspects of night flying.
Lighted airports located away from congested areas can be identified readily at night by the lights outlining the runways. Airports located near or within large cities are often difficult to identify in the maze of lights. It is important not to only know the exact location of an airport relative to the city, but also to be able to identify these airports by the characteristics of their lighting pattern.
Aeronautical lights are designed and installed in a variety of colors and configurations, each having its own purpose. Although some lights are used only during low ceiling and visibility conditions, this discussion includes only the lights that are fundamental to visual flight rules (VFR) night operation.
It is recommended that prior to a night flight, and particularly a cross-country night flight, the pilot check the availability and status of lighting systems at the destination airport. This information can be found on aeronautical charts and in the Airport/Facility Directory. The status of each facility can be determined by reviewing pertinent Notices to Airmen (NOTAMs).
A rotating beacon is used to indicate the location of most airports. The beacon rotates at a constant speed, thus producing what appears to be a series of light flashes at regular intervals. These flashes may be one or two different colors that are used to identify various types of landing areas. For example:
• Lighted civilian land airports—alternating white and green.
• Lighted civilian water airports—alternating white and yellow.
• Lighted military airports—alternating white and green, but are differentiated from civil airports by dual peaked (two quick) white flashes, then green.
Beacons producing red flashes indicate obstructions or areas considered hazardous to aerial navigation. Steady burning red lights are used to mark obstructions on or near airports and sometimes to supplement flashing lights on en route obstructions. High intensity flashing white lights are used to mark some supporting structures of overhead transmission lines that stretch across rivers, chasms, and gorges. These high intensity lights are also used to identify tall structures, such as chimneys and towers.
As a result of the technological advancements in aviation, runway lighting systems have become quite sophisticated to accommodate takeoffs and landings in various weather conditions. However, the pilot whose flying is limited to VFR only needs to be concerned with the following basic lighting of runways and taxiways.
The basic runway lighting system consists of two straight parallel lines of runway-edge lights defining the lateral limits of the runway. These lights are aviation white, although aviation yellow may be substituted for a distance of 2,000 feet from the far end of the runway to indicate a caution zone. At some airports, the intensity of the runway-edge lights can be adjusted to satisfy the individual needs of the pilot. The length limits of the runway are defined by straight lines of lights across the runway ends. At some airports, the runway threshold lights are aviation green, and the runway end lights are aviation red.
At many airports, the taxiways are also lighted. Ataxiway- edge lighting system consists of blue lights that outline the usable limits of taxi paths.
PREPARATION AND PREFLIGHT
Night flying requires that pilots be aware of, and operate within, their abilities and limitations. Although careful planning of any flight is essential, night flying demands more attention to the details of preflight preparation and planning.
Preparation for a night flight should include a thorough review of the available weather reports and forecasts with particular attention given to temperature/dewpoint spread. A narrow temperature/dewpoint spread may indicate the possibility of ground fog. Emphasis should also be placed on wind direction and speed, since its effect on the airplane cannot be as easily detected at night as during the day.
On night cross-country flights, appropriate aeronautical charts should be selected, including the appropriate adjacent charts. Course lines should be drawn in black to be more distinguishable.
Prominently lighted checkpoints along the prepared course should be noted. Rotating beacons at airports, lighted obstructions, lights of cities or towns, and lights from major highway traffic all provide excellent visual checkpoints. The use of radio navigation aids and communication facilities add significantly to the safety and efficiency of night flying. All personal equipment should be checked prior to flight to ensure proper functioning. It is very disconcerting to find, at the time of need, that a flashlight, for example, does not work. All airplane lights should be turned ON momentarily and checked for operation. Position lights can be checked for loose connections by tapping the light fixture. If the lights blink while being tapped, further investigation to determine the cause should be made prior to flight.
The parking ramp should be examined prior to entering the airplane. During the day, it is quite easy to see stepladders, chuckholes, wheel chocks, and other obstructions, but at night it is more difficult. A check of the area can prevent taxiing mishaps.
STARTING,TAXIING, AND RUNUP
After the pilot is seated in the cockpit and prior to starting the engine, all items and materials to be used on the flight should be arranged in such a manner that they will be readily available and convenient to use.
Extra caution should be taken at night to assure the propeller area is clear. Turning the rotating beacon ON, or flashing the airplane position lights will serve to alert persons nearby to remain clear of the propeller. To avoid excessive drain of electrical current from the battery, it is recommended that unnecessary electrical equipment be turned OFF until after the engine has been started.
After starting and before taxiing, the taxi or landing light should be turned ON. Continuous use of the landing light with r.p.m. power settings normally used for taxiing may place an excessive drain on the airplane’s electrical system. Also, overheating of the landing light could become a problem because of inadequate airflow to carry the heat away. Landing lights should be used as necessary while taxiing. When using landing lights, consideration should be given to not blinding other pilots. Taxi slowly, particularly in congested areas. If taxi lines are painted on the ramp or taxiway, these lines should be followed to ensure a proper path along the route.
The before takeoff and runup should be performed using the checklist. During the day, forward movement of the airplane can be detected easily. At night, the airplane could creep forward without being noticed unless the pilot is alert for this possibility. Hold or lock the brakes during the runup and be alert for any forward movement.
TAKEOFF AND CLIMB
Night flying is very different from day flying and demands more attention of the pilot. The most noticeable difference is the limited availability of outside visual references. Therefore, flight instruments should be used to a greater degree in controlling the airplane. This is particularly true on night takeoffs and climbs. The cockpit lights should be adjusted to a minimum brightness that will allow the pilot to read the instruments and switches and yet not hinder the pilot’s outside vision. This will also eliminate light reflections on the windshield and windows.
After ensuring that the final approach and runway are clear of other air traffic, or when cleared for takeoff by the tower, the landing lights and taxi lights should be turned ON and the airplane lined up with the centerline of the runway. If the runway does not have centerline lighting, use the painted centerline and the runwayedge lights. After the airplane is aligned, the heading indicator should be noted or set to correspond to the known runway direction. To begin the takeoff, the brakes should be released and the throttle smoothly advanced to maximum allowable power. As the airplane accelerates, it should be kept moving straight ahead between and parallel to the runway-edge lights.
The procedure for night takeoffs is the same as for normal daytime takeoffs except that many of the runway visual cues are not available. Therefore, the flight instruments should be checked frequently during the takeoff to ensure the proper pitch attitude, heading, and airspeed are being attained. As the airspeed reaches the normal lift-off speed, the pitch attitude should be adjusted to that which will establish a normal climb. This should be accomplished by referring to both outside visual references, such as lights, and to the flight instruments.
[Figure 10-3 Establish a positive climb]
After becoming airborne, the darkness of night often makes it difficult to note whether the airplane is getting closer to or farther from the surface. To ensure the airplane continues in a positive climb, be sure a climb is indicated on the attitude indicator, vertical speed indicator (VSI), and altimeter. It is also important to ensure the airspeed is at best climb speed.
Necessary pitch and bank adjustments should be made by referencing the attitude and heading indicators. It is recommended that turns not be made until reaching a safe maneuvering altitude.
Although the use of the landing lights provides help during the takeoff, they become ineffective after the airplane has climbed to an altitude where the light beam no longer extends to the surface. The light can cause distortion when it is reflected by haze, smoke, or fog that might exist in the climb. Therefore, when the landing light is used for the takeoff, it may be turned off after the climb is well established provided other traffic in the area does not require its use for collision avoidance.
ORIENTATION AND NAVIGATION
Generally, at night it is difficult to see clouds and restrictions to visibility, particularly on dark nights or under overcast. The pilot flying under VFR must exercise caution to avoid flying into clouds or a layer of fog. Usually, the first indication of flying into restricted visibility conditions is the gradual disappearance of lights on the ground. If the lights begin to take on an appearance of being surrounded by a halo or glow, the pilot should use caution in attempting further flight in that same direction. Such a halo or glow around lights on the ground is indicative of ground fog. Remember that if a descent must be made through fog, smoke, or haze in order to land, the horizontal visibility is considerably less when looking through the restriction than it is when looking straight down through it from above. Under no circumstances should a VFR night-flight be made during poor or marginal weather conditions unless both the pilot and aircraft are certificated and equipped for flight under instrument flight rules (IFR).
The pilot should practice and acquire competency in straight-and-level flight, climbs and descents, level turns, climbing and descending turns, and steep turns. Recovery from unusual attitudes should also be practiced, but only on dual flights with a flight instructor. The pilot should also practice these maneuvers with all the cockpit lights turned OFF. This blackout training is necessary if the pilot experiences an electrical or instrument light failure. Training should also include using the navigation equipment and local NAVAIDs.
In spite of fewer references or checkpoints, night crosscountry flights do not present particular problems if preplanning is adequate, and the pilot continues to monitor position, time estimates, and fuel consumed. NAVAIDs, if available, should be used to assist in monitoring en route progress.
Crossing large bodies of water at night in singleengine airplanes could be potentially hazardous, not only from the standpoint of landing (ditching) in the water, but also because with little or no lighting the horizon blends with the water, in which case, depth perception and orientation become difficult. During poor visibility conditions over water, the horizon will become obscure, and may result in a loss of orientation. Even on clear nights, the stars may be reflected on the water surface, which could appear as a continuous array of lights, thus making the horizon difficult to identify.
Lighted runways, buildings, or other objects may cause illusions to the pilot when seen from different altitudes. At an altitude of 2,000 feet, a group of lights on an object may be seen individually, while at 5,000 feet or higher, the same lights could appear to be one solid light mass. These illusions may become quite acute with altitude changes and if not overcome could present problems in respect to approaches to lighted runways.
APPROACHES AND LANDINGS
When approaching the airport to enter the traffic pattern and land, it is important that the runway lights and other airport lighting be identified as early as possible. If the airport layout is unfamiliar to the pilot, sighting of the runway may be difficult until very close-in due to the maze of lights observed in the area.
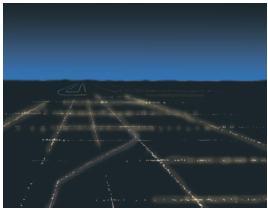
[Figure 10-4 Use light patterns for orientation]
The pilot should fly toward the rotating beacon until the lights outlining the runway are distinguishable. To fly a traffic pattern of proper size and direction, the runway threshold and runway-edge lights must be positively identified. Once the airport lights are seen, these lights should be kept in sight throughout the approach. Use light patterns for orientation.
Distance may be deceptive at night due to limited lighting conditions. A lack of intervening references on the ground and the inability of the pilot to compare the size and location of different ground objects cause this. This also applies to the estimation of altitude and speed. Consequently, more dependence must be placed on flight instruments, particularly the altimeter and the airspeed indicator.
When entering the traffic pattern, allow for plenty of time to complete the before landing checklist. If the heading indicator contains a heading bug, setting it to the runway heading will be an excellent reference for the pattern legs.
Every effort should be made to maintain the recommended airspeeds and execute the approach and landing in the same manner as during the day. A low, shallow approach is definitely inappropriate during a night operation. The altimeter and VSI should be constantly cross-checked against the airplane’s position along the base leg and final approach. A visual approach slope indicator (VASI) is an indispensable aid in establishing and maintaining a proper glidepath.
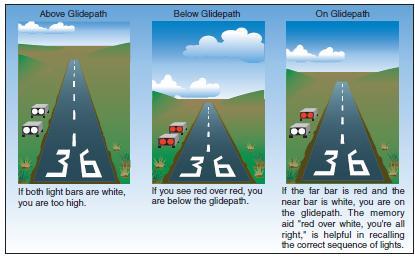
[Figure 10-5 VASI]
After turning onto the final approach and aligning the airplane midway between the two rows of runway-edge lights, the pilot should note and correct for any wind drift. Throughout the final approach, pitch and power should be used to maintain a stabilized approach. Flaps should be used the same as in a normal approach. Usually, halfway through the final approach, the landing light should be turned on. Earlier use of the landing light may be necessary because of “Operation Lights ON” or for local traffic considerations. The landing light is sometimes ineffective since the light beam will usually not reach the ground from higher altitudes. The light may even be reflected back into the pilot’s eyes by any existing haze, smoke, or fog. This disadvantage is overshadowed by the safety considerations provided by using the “Operation Lights ON” procedure around other traffic.
The roundout and touchdown should be made in the same manner as in day landings. At night, the judgment of height, speed, and sink rate is impaired by the scarcity of observable objects in the landing area. The inexperienced pilot may have a tendency to round out too high until attaining familiarity with the proper height for the correct roundout. To aid in determining the proper roundout point, continue a constant approach descent until the landing lights reflect on the runway and tire marks on the runway can be seen clearly. At this point the roundout should be started smoothly and the throttle gradually reduced to idle as the airplane is touching down.

[Figure 10-6 Roundout when tire marks are visible]
During landings without the use of landing lights, the roundout may be started when the runway lights at the If both light bars are white, you are too high. If you see red over red, you are below the glidepath. Above Glidepath Below Glidepath On Glidepath If the far bar is red and the near bar is white, you are on the glidepath. The memory aid "red over white, you're all right," is helpful in recalling the correct sequence of lights. Figure 10-5.VASI. Figure 10-6. Roundout when tire marks are visible far end of the runway first appear to be rising higher than the nose of the airplane. This demands a smooth and very timely roundout, and requires that the pilot feel for the runway surface using power and pitch changes, as necessary, for the airplane to settle slowly to the runway. Blackout landings should always be included in night pilot training as an emergency procedure.
NIGHT EMERGENCIES
Perhaps the pilot’s greatest concern about flying a singleengine airplane at night is the possibility of a complete engine failure and the subsequent emergency landing. This is a legitimate concern, even though continuing flight into adverse weather and poor pilot judgment account for most serious accidents. If the engine fails at night, several important procedures and considerations to keep in mind are:
• Maintain positive control of the airplane and establish the best glide configuration and airspeed. Turn the airplane towards an airport or away from congested areas.
• Check to determine the cause of the engine malfunction, such as the position of fuel selectors, magneto switch, or primer. If possible, the cause of the malfunction should be corrected immediately and the engine restarted.
• Announce the emergency situation to Air Traffic Control (ATC) or UNICOM. If already in radio contact with a facility, do not change frequencies, unless instructed to change.
• If the condition of the nearby terrain is known, turn towards an unlighted portion of the area. Plan an emergency approach to an unlighted portion.
• Consider an emergency landing area close to public access if possible. This may facilitate rescue or help, if needed.
• Maintain orientation with the wind to avoid a downwind landing.
• Complete the before landing checklist, and check the landing lights for operation at altitude and turn ON in sufficient time to illuminate the terrain or obstacles along the flightpath. The landing should be completed in the normal landing attitude at the slowest possible airspeed. If the landing lights are unusable and outside visual references are not available, the airplane should be held in level-landing attitude until the ground is contacted.
• After landing, turn off all switches and evacuate the airplane as quickly as possible.
Selected Knowledge field from the left to find out more about knowledge related to Pilot Training.
Click here to get a complete list of Aircraft Schools the entire United States.
Copyright © 2008 AirplaneGroundSchools.com | All Rights Reserved
Design G. Wolfgang | W3C XHTML 1.0 | W3C CSS 2.0
Courtesy Open Web Design![]() Thanks to Florida Vacation Homes
Thanks to Florida Vacation Homes